Loading...
Loading...
Loading...
Loading...
Loading...
Loading...
Loading...
Loading...
Loading...
Loading...
Loading...
Loading...
Loading...
Loading...
Loading...
Loading...
Loading...
Loading...
Loading...
Loading...
Loading...
Loading...
Loading...
Loading...
Loading...
Loading...
Loading...
Loading...
Loading...
Loading...
Loading...
Loading...
Loading...
Loading...
Loading...
Loading...
Loading...
Loading...
Loading...
Loading...
Loading...
Loading...
Loading...
Loading...
Loading...
Loading...
Loading...
Loading...
Loading...
Loading...
Loading...
Loading...
Loading...
Loading...
Loading...
Loading...
Loading...
Loading...
Loading...
Loading...
Loading...
Loading...
Loading...
Loading...
Loading...
Loading...
Loading...
Loading...
Loading...
Loading...
Loading...
Loading...
Loading...
Loading...
Loading...
Loading...
Loading...
Loading...
Loading...
Loading...
Loading...
Loading...
Loading...
Loading...
Loading...
Loading...
Loading...
Loading...
Loading...
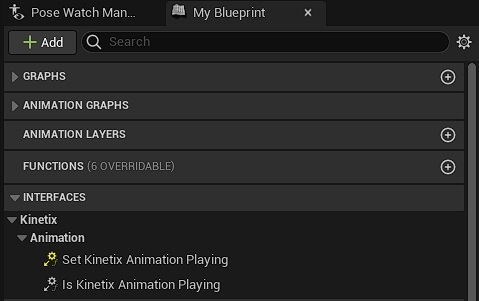
Kinetix has created state of the art Machine Learning models to make animation creation as easy as it should be.
Kinetix AI allows for single camera motion capture. Our AI deep learning algorithms can extract any human motion from any single camera video.
Kinetix AI will analyze the video sent by the player, identify the human that's appearing, and read their movement, in 3D (recreating depth). Once the movement is fully analyzed, it will be recreated in 3D to generate an animation file. Then, the animation is retargeted on any custom avatar.
Kinetix tracks body movements at specific positions and then name them at each critical joints (e.g. feet, ankle, knee, shoulder, elbow). To get the best final output, Kinetix AI is making predictions accurate at the centimeter scale.
Hands movements are even more complex to detect but nothing’s impossible! At the moment, Kinetix AI is spotting if the fists are clenched, hands and fingers are opened or fingers are detached (celebrating victories ✌️for example). More complex hands movements are still hard to detect but Kinetix keeps improving its models at large scale.
Kinetix AI can also detect and isolate half body movements while keeping the other half static during the transposition process.
Which means you can create both lower body or upper body isolated animations while outputting a full body animation in the end.
Facial motion is currently not recognized by our algorithm.
Stay tuned! The feature is being developed and will arrive soon.
Kinetix provides a User-Generated Emote feature to boost your game's engagement and revenues.
Welcome to the Kinetix documentation. You will find tutorials and technical information to help you navigate our technologies and integrate our User-Generated Emote feature in your game or app.
With the User-Generated Emote feature, players can create a custom emote from any video, directly in the game, and play it on their avatar. All it takes is a phone camera or any video for Kinetix's AI to create and play an animation in-game.
Kinetix's User-Generated Emote feature is designed to be seamlessly integrated into any of the most popular game engine available on the market.
To integrate Kinetix's User-Generated Emote, you can choose from 2 options:
An all-in-one, plug-and-play solution with the Kinetix SDK
A more flexible solution with the Kinetix API
Choose the integration method that fits your needs best:
Kinetix's emotes meet with very strict standards to maximize their compatibility with any game.
Kinetix has carefully benchmarked every emote available on the market to come up with these emote standards that match any avatar-based game constraints to ensure an optimal gamer experience (example: avoid collisions) and the full compatibility of any emotes distributed through our technologies.
Name: Every Emote has a unique name.
Mature content: Y/N, useful metadata for moderation purposes
Emote duration: Kinetix emotes have a duration in between 1 to 10 sec
Emote Icon: All Kinetix emotes come with an associated icon for an optimal emote listing and distribution
Emote Gif: All Classic Emotes come with an associated gif for an optimal apprehension of the Emote
Emote ID: A unique ID composed of 36 characters to identify any Emote available.
We boost video games' engagement with an AI-powered User-Generated Emote technology.
Established with a passion for redefining the way players connect, express, and engage, Kinetix have embarked on a journey to enhance the gaming experience. We believe in the power of AI to serve in-game self-expression, customization, socialization and limitless creativity.
Our mission is to empower game developers to unlock the full potential of their game. We're here to provide them with the tools and resources they need to elevate player engagement, keep the games fresh and dynamic, and immerse their players in social, customizable, and expressive gaming world.
We believe that players too, can be creators, through UGC. There is no greater tool than generative AI to empower players with fantastic creation opportunities, without requiring any technical difficulties. By giving players the tools to craft their emotes, Kinetix fosters a vibrant and inclusive community where player expression is celebrated.
To achieve this vision, we believe that there is no better asset than Emotes!
We developed our AI-powered User-Generated Emote technology to enable any game or virtual world to benefit from the potential of UGC. Empowering players with the possibility to craft emotes increases engagement, socialization & customization in-game and unlock new revenue streams.
The User-Generated Emote feature is essentially an emote creator to be embedded directly in-game, allowing players to craft custom emotes from any video.
Let your players create & play custom emotes directly in your game, using our AI-powered User-Generated Emote feature. Integrate it with just a few lines of code, and boost your game's engagement as you empower your players with unlimited expression capabilities.
Kinetix technologies include a proprietary retargeting algorithm that automatically transfers the motion of the emote to any human avatar in your game.
Our cloud-based technology is designed to enable an unlimited amount of Emotes to be played simultaneously without altering the game performance.
Also, multiple players can create and/or play User-Generated Emotes in the same time, without damaging their in-game experience or your servers.
Once onboarded with our User-Generated Emote feature, you can monetize the created emotes the way you want, if you want to! You possess all rights to monetize every emotes distributed via our technologies to your users.
Kinetix's User-Generated Emote feature adapts to your revenue model and unlock various monetization opportunities based on emotes.
In-game stores: Integrate User-Generated Emote creation tokens in your in-game store. Monetize User-Generated Emotes and make them exclusive and rare items that only your top players can showcase.
Loot boxes and crates: diversify the content of your loot boxes by offering User-Generated Emote creation tokens.
Battle Pass: Fill your Battle Pass with valuable items including User-Generated Emote tokens to diversify the content of your Pass.
Leveraging Kinetix's User-Generated Emote offers a multitude of compelling reasons to enhance your gaming experience and player engagement. Here are the key benefits:
Enhanced User Engagement: Emotes create memorable and shareable moments for players. By empowering them to express themselves with custom moves through their avatars, you cultivate a sense of personalization and social interaction, leading to increased player engagement and retention.
Immersive Gameplay Experience: User-Generated Emotes add a new layer of immersion to your games. They allow players to express emotions and interact with the virtual world in a more meaningful way, enhancing their overall experience and emotional connection to the game.
Cutting-Edge AI Technology: Kinetix's User-Generated Emote technology is driven by state of the art AI, setting it apart from traditional emote systems. Embracing AI technologies early makes your game a precursor!
Future-Proof Your Game: As AI continues to advance, Kinetix AI Emote technologies position your game at the forefront of innovation. Embracing AI-driven technologies lays the foundation for integrating AI-generated assets, worlds, and experiences into your gameplay, keeping your game relevant and exciting for years to come.
Effortless Integration: The Kinetix SDK is designed with simplicity in mind. Integrating our SDK into your existing game engine is seamless, saving your development team valuable time and resources. It allows you to focus on creating compelling gameplay and content while we handle the complexities of emote management.
Monetization Opportunities: UGC can open up new revenue streams for your game. With our technologies, you can offer players the chance to customize their experience and invest in their in-game identities.
Continued Support and Updates: By leveraging Kinetix's User-Generated Emote, you gain access to ongoing support and regular updates. We are dedicated to refining our technology and adding new features, ensuring that your game remains at the forefront of the industry.
Each Kinetix emote created by a player using the feature comes with a rich metadata structure for an optimal listing and perception from you and your users:
Every emote created with the feature can be played with any humanoid 3D avatar.
In case your avatars have a specific or complex morphology, our proprietary might be applicable to avoid inter-penetration while playing any emote.
1. Integrate Kinetix technologies into your game
or
2. Leverage Kinetix technologies at Run Phase
and
Learn more about our AI UGC technology
Integrate the SDK
Integrate the API
Manage UGC Emotes
API References
Support
Turn your players into creators with our AI-powered User-Generated Emote feature!
With the User-Generated Emote feature, players can create a custom emote from any video, directly in the game, and play it on their avatar. All it takes is a phone camera or any video for Kinetix's AI to create and play an animation in-game.
This documentation page will guide you through the exciting possibilities of user-generated emotes and how to integrate them into your gameplay.
User-Generated Emote is a unique UGC feature that enables players to create a custom emote from a video, directly in the game.
The feature relies on state-of-the-art deep learning AI algorithms that turn videos into animations. Thanks to this pioneering technology, players can bring any movement from a video into their game.
Boost your game's engagement as you turn your players into creators and allow for more content generation, self-expression, and customization.
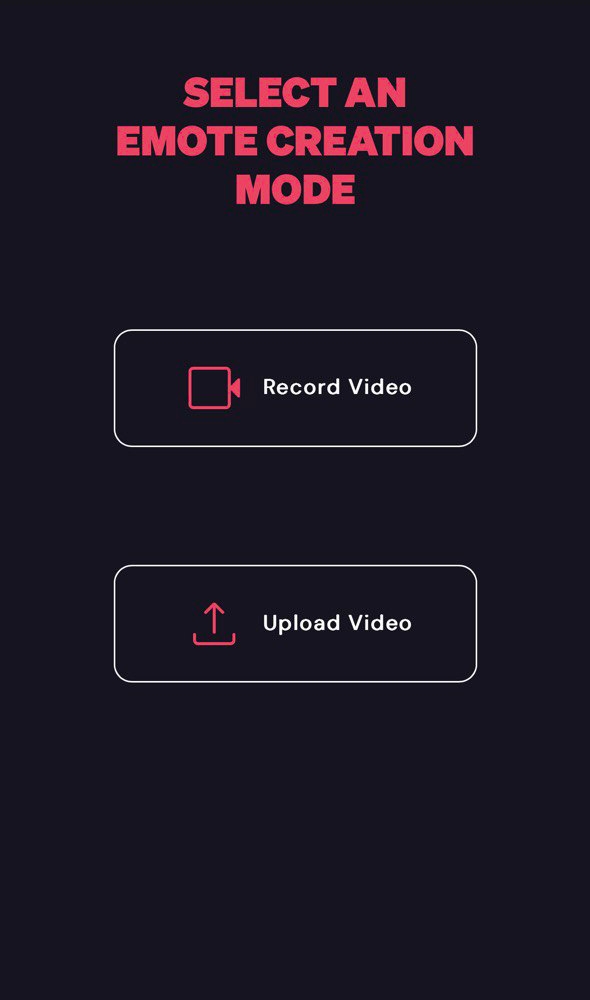
Players can upload videos from different sources:
Upload from device: it lets players pick a video stored locally on their device.
Upload from the Internet: it lets players upload videos by simply pasting an URL link, allowing players to create an emote from a TikTok or Instagram video for instance.
Self-record: players can directly use their phone camera to film themselves as they perform the movement they would like to turn into an emote.
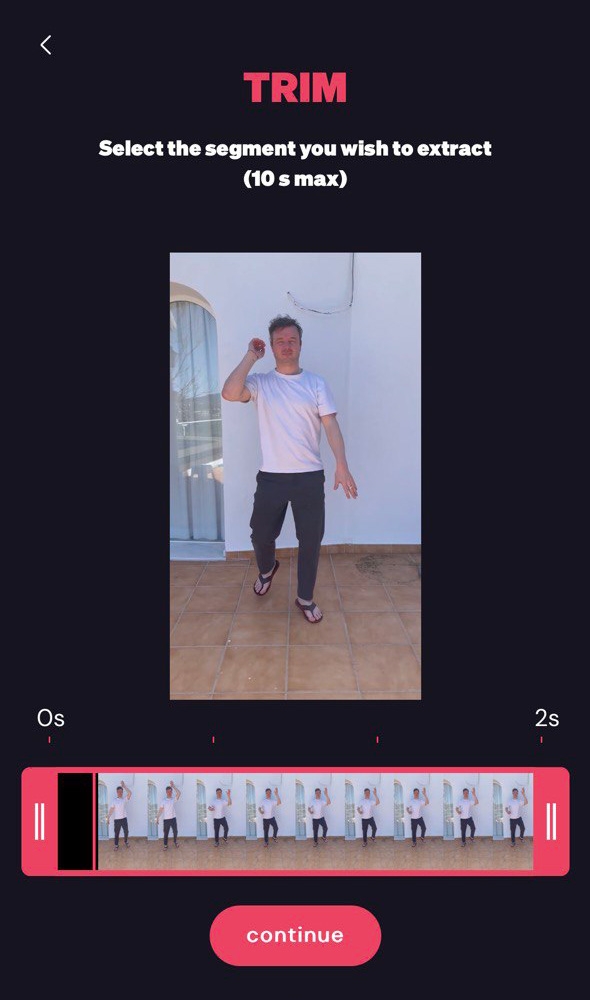
Players can easily select the exact moment containing the movement they would like to turn into an emote. Likewise, they can crop their video to remove elements that could mislead the AI.
Video cropping and trimming allow players to optimize their video without requiring any video editing skills or software.
Since its inception, Kinetix has always thrived to democratize access to 3D animation creation with AI. To do so, the team has designed state of the art machine learning models that are seamlessly integrated into game-oriented product bricks to make emote creation as easy as recording a video.
The overall User-Generated Emote process can be synthetized in 4 main steps:
Kinetix AI will analyze the video sent by the player, identify the human that's appearing, and read their movement, in 3D (recreating depth).
Learn more about Kinetix's video-to-animation AI technology:
Kinetix designed a Moderation layer to prevent players from adding unwanted content in the game. It consists in analyzing the video sent by the player, and removing any prohibited movement detected.
Kinetix has designed a robust and comprehensive moderation system to review and approve user-generated emotes while keeping you in the loop.
Once the video has been approved by the moderation, the movement extraction begins. Our AI will create an animation file containing the exact same movement as the one detected in the video. The 3D animation file will be created on Kinetix's standard avatar.
Since players want to play their custom custom on their avatar, Kinetix AI needs to apply the generated animation to the player's avatar.
At Kinetix, we developed our own proprietary retargeting technology to guarantees full compatibility with any humanoid character.
Our automated retargeting not only adapts to the avatar's skeleton like any other traditional retargeting method, but also considers the character's mesh, which allows our AI to adapt the adjust the generated emote based on the avatar's specific body shape.
Learn more about Kinetix's retargeting technology:
Bring Your World into the Game: Players can infuse their in-game experience with a personal touch by creating emotes from content they love and are passionate about. This direct control over in-game expressions allows players to integrate their personal interests, favorite moments, or trending content into their gaming world, making every emote a personalized statement.
Creative Freedom: Offering players the ability to craft emotes from their chosen content empowers them with unparalleled creative freedom. This not only enhances their attachment to the game but also encourages a sense of ownership and pride in their in-game representation.
Foster Community Interaction: Custom emotes become a new medium for players to communicate, share, and celebrate with each other, strengthening the game's community and social bonds.
Encourage Continuous Play: The novelty and enjoyment of creating and using personal emotes motivate players to return regularly, maintaining high levels of engagement and long-term interest in the game.
Community Co-Creation: This feature fosters a collaborative environment where players contribute to the game’s evolving culture. Shared creativity leads to a dynamic and ever-changing community, bonded over shared interests and collective content creation.
Transformative Entertainment: The fun of translating real-life movements into game-specific emotes adds a layer of entertainment that’s both engaging and immersive, keeping players invested in the game.
Viral Potential: Players are likely to share their innovative emotes on social platforms, drawing attention to the game and attracting new players who want to partake in the fun and creativity.
You can now integrate as many User-Generated Emotes as you want without any downside on your games performances nor player immersion.
Integrate User-Generated Emotes seamlessly into your gameplay experience, allowing gamers to create, own and use their custom emotes for any interactive or social activities.
Enrich your gameplay with User-Generated Emotes features and Implement features such as emote sharing, liking, and commenting to encourage social interaction and engagement.
Make User-Generated Emotes an exclusive asset and monetize accordingly. We strongly recommend to consider UGE as the top tier in terms of Emote rarity.
The pricing associated with Kinetix User-Generated Emote pipes is per API call. We charge with a fixed price every time our APIs are called, which corresponds to every emote generated by a player.
A standard pricing of €0.10 per emote generated by your players will be applied.
There are 2 ways to unlock User-Generated Emote features in your game:
With Kinetix SDK: all-in-one solution that includes the access to the feature, in addition to multiple technologies to optimize the integration and run phase experiences. Kinetix SDK
With the Emote Creation API endpoints: access the emote creation feature only. You have to create your own infrastructure around the feature to support it. Kinetix API
User-Generated Emotes unlock a world of creativity and self-expression for games and their players, elevating the gaming experience to new heights. By embracing user-generated content, you can create an inclusive and dynamic gaming community that thrives on player participation and engagement.
Even though the feature is made for players to create custom emotes in-game, you can try the feature on the Kinetix Developer Portal.
To discover how you can try the User-Generate Emote feature on your custom avatar, you can follow this video guide:
STEP 3: in the "Try UGC Emote" section of the Developer Portal, click on "create an animation", and then on "From a video".
Once your video has been sent, our AI will need a couple of minutes to process the User-Generated emote.
STEP 4: preview your user-generated emote on your custom avatar!
Check for more info about our moderation approach.
Learn more about .
We implemented a demo version of the User-Generated Emote feature so that you can preview what the feature will look like for your players on your avatars. This demo version is accessible online, on the Kinetix .
In this page you will learn how to try the User-Generated Emote feature for yourself. Players should never have access to your Developer Portal. If you want to integrate the feature in your game, head to the corresponding section: - (SDK) - (SDK) -
STEP 1: log into your .
STEP 2: in the "Avatar Management" section, click on "upload an avatar" and check the bone mapping. If you have any questions about this step, head to to find the dedicated tutorial.
When uploading a video make sure you meet the . Note that your players will have to follow the same best practices in your game.
If you need any information about the tool's specifications, you can learn about it .
In case an error happens, please .
The Kinetix SDK has been carefully tested and approved in various environments.
Unity 2020.3 LTS to Unity 2023.2.20f1
PC, Mac, WebGL, Android & iOS
Unreal Engine 5.2, 5.3, 5.4
PC & Mac
With Kinetix's proprietary retargeting algorithm, emotes created using the User-Generated Emote feature can be played on any humanoid avatar.
Emote retargeting is a powerful technique in the world of 3D animation. It allows you to transfer an animation from one avatar to another, regardless of their size, proportions, or skeletal structure. Instead of creating a unique animation for each character, emote retargeting streamlines the process by adapting a single emote to fit various avatars.
Each character in a 3D animation typically has a skeletal structure with bones and joints. All the Emotes from the Kinetix Emote Library and User-Generated Emotes are created for a specific and standard character with a standard skeleton.
Kinetix's proprietary algorithm is able to transfer the motion from Kinetix's standard avatar to the target's avatar, almost fully automatically. The algorithm will proactively identify the correspondence between the bones of the target skeleton and those of the source skeleton, and the user will then need to confirm and correct errors if necessary. Once the Bone Mapping is done, Kinetix's Retargeting Algorithm will adapt the motion to the target avatar's bones proportions to ensure that the movement is smooth and great.
Here is what the Kinetix Standard Skeleton looks like:
Bone Mapping is a crucial, semi-automated part of the retargeting process. It allows our AI to understand the target's skeletal structure and adapt the motion from the Kinetix Standard Avatar to the target avatar.
In a matter of seconds, our algorithm presents the results of this mapping, allowing the user to review and fine-tune the automatic bone mapping. This empowers users to correct any incorrectly assigned bones and map any unassigned bones, resulting in precise skeletal adaptation for animation, thereby saving time and ensuring animation accuracy.
When target avatars feature intricate designs, such as unusual bone structures, very particular bone lengths, complex morphologies, or incorporate wearables, it can potentially lead to issues like inter-penetrations that diminish the overall output quality.
To address this concern, Kinetix has devised a unique retargeting method that factors in the character's mesh, proactively anticipating and mitigating contact errors. In this process, the algorithm strategically positions 45 key points among the character's vertices, effectively capturing the character's comprehensive morphology.
After correctly positioning the key points, our algorithm takes charge of the retargeting process. As usual, it seamlessly transfers the motion from the source's joints and bones to the target's skeletal structure, but this time, the motion is optimized while adhering to the constraints set by the key points.
Here is an output sample that highlights the value of the Contact-Aware retargeting:
Kinetix SDK is designed and optimized for any Unity based game.
For a quick integration, you can follow an accelerated flow:
When a user , Kinetix's Bone Mapping algorithm will analyze the skeleton of the character and identify his bones and joints. Our AI will try to figure out which bone from the uploaded skeleton matches the original bone from the source skeleton, and repeat this identification process for the whole skeleton.
STEP 1 - DOWNLOAD THE SDK & SET-UP UNITY
STEP 2 - CONFIGURE THE CORE PACKAGE
STEP 3 - INTEGRATE THE USER-GENERATED EMOTE FEATURE
The SDK contains a sample scene for you to test the User-Generated Emote feature. The sample scene is obviously optional: you don't have to download it to activate the User-Generated Emote feature.
To let you create user-generated emotes in your game for testing purposes, Kinetix developed a sample scene that is an optional part of the SDK. It will guide you through the whole emote creation process so you can get started with the User-Generated Emote feature integration.
By clicking on the "Let's create an emote!" button, you will access an adapted version of the Progressive Web App (PWA) your players will use to create emotes. It the test version you have access to, you can only upload videos from your desktop (while players can also record themselves or paste a video link from the Internet).
Follow the flow, and upload a video to create an emote.
Disclaimer: the "Create" tab and the emote wheel are not included anymore.
To integrate the User-Generated Emote feature, you can choose between the Kinetix SDK or the Kinetix APIs. This page will help you find out which one suits your needs best.
API & SDK: functionalities comparison
Additional work that remains once you've integrated the API or the SDK
Pre-requisites to integrate one or the other
Next steps to integrate
With the SDK, the request (for exemple the video to process) will come directly from the end user.
For the API, Kinetix will receive these requests from your game server that will take them from the users.
Having the SDK directly communicating with players' clients offers strong benefits:
Reduced Latency: Direct communication between the Kinetix servers and the players' clients can significantly reduce latency. Without a game server acting as an intermediary, data travels a shorter path, resulting in faster response times and a smoother user experience, especially crucial for real-time interactions and animations.
Lower Server Load: By bypassing the game server, you reduce its workload. This can lead to lower operating costs, as the game server has fewer data processing tasks, potentially decreasing the need for extensive infrastructure and reducing the likelihood of bottlenecks during peak usage times.
Simplified Architecture: Direct SDK integration simplifies the overall system architecture. Fewer components in the communication chain mean there are fewer points of failure, which can enhance system reliability and ease the maintenance and troubleshooting processes.
In both cases, the compute of the video is run on Kinetix's servers, never on your servers nor the end-user's computer.
By using the SDK, you also have access to a real time retargeting that can be used to play an emote that is not known yet by our system.
If you integrate the SDK, you will be able to access our pre-built mobile Progressive Web App (PWA). Players can access the PWA on their phone directly from the game by scanning a QR code. The PWA allows players to upload the videos they want to turn into an emote and send it to Kinetix. You can modify the UI/UX of the PWA as you want.
If you integrate our technology with the API REST method, you will have to build the PWA on your own.
Once the video has been transformed into an emote thanks to our technology, it is vital to send that emote in real time to every other users that will need to see it. This is taken care of in an optimized flow in our SDK, but that will need to be re implemented if you choose to integrate the API.
The networking system included with the SDK includes:
RAM optimizations:
Cloud storage: Since players cannot store ALL the user-generated emotes played by all the players, emotes but be stored on a cloud server.
Emote streaming: emotes are streamed into the game, not to overload players' RAM when a lot of user-generated emotes are played simultaneously. Emote streaming consists in dividing the emote files in small chunks, to allow players to download emotes chunk-by-chunk, instead of downloading multiple entire emote files. Downloading small chunks of multiple different emotes allow players to see multiple emotes simultaneously without any lag.
Server & player clients transfers optimizations:
Send only the files players need: sending EVERY generated emote file to EVERY player would result in unreasonable amounts of data transferred. The SDK only sends the emote files when the players need it. For instance, when a player plays a user-generated emote, only him and the players nearby will stream-download the required emote file.
Smart caching: our SDK includes optimizations to allow players to store on their RAM some emotes that are quite likely to be played again, in order to avoid multiple transfers of the same emote file in a short range of time.
In-game experience optimization: emote streaming and smart caching enable players to create, play, and see multiple user-generated emotes simultaneously. Without these two combined bricks, it's very unlikely that players would not experience lags and delays when a very high number of emotes are played in the same time in a local room (unless there's a way to pre-load emote files in your game).
If you choose to integrate the User-Generated Emote feature using the Kinetix API method, it is likely that you have to replicate some parts of the SDK's networking system, if not all of it.
Kinetix helps you take care of the moderation of User-Generated Content added to your game.
Kinetix designed two moderation layers to ensure optimal safety for your game:
AI Moderation: the videos sent by the players are analyzed with AI. Any unwanted movement will be removed when the emote file is generated.
Integrating the User-Generated Emote feature with the SDK or the API will both let you access the UGC Management platform we have designed on the Developer Portal.
Only games that integrated the Kinetix SDK can access the AI Moderation for now.
The SDK does not require any additional work from you for the User-Generated Emote to work in your game: the SDK is a complete infrastructure with prebuilt solutions. You may still want to customize the UI/UX, obviously.
After you've integrated the API, you still have to handle:
The system to allow the user to upload the video to be turned into an emote Video Uploading Management
The network system that will allow everyone in the room to see the emote in real time Management of Emote Networking
Follow the flow from these sections to integrate the SDK or API.
In this page, we will help you install the Kinetix SDK's Core Package for Unity.
Open your Unity project and open the Unity Package Manager Window on "Window > Package Manager".
In the Package Manager window click on the " + " icon in the top left corner and select Add Package From Git URL.
Paste in this URL and click "Add":
In the Kinetix window, click on Package Manager.
Click on "Install Core Bundle"
The Kinetix SDK is a plug-and-play solution to integrate our User-Generated Emote feature and all the Kinetix technologies we have developed around it.
The Kinetix SDK is a powerful cloud-based toolkit that lets you leverage our advanced User-Generated Emote technologies easily.
The SDK Integration can not be cumulated with the API Integration. Please, make sure that the SDK Integration is the most appropriate integration method for you by visiting the dedicated page: SDK or API: what to choose.
The Kinetix User-Generated Emote feature allows your players to create, share, and socialize with their own unique emotes whatever the game environment, adding a personalized touch to your gaming experience. Learn more about the User-Generated Emote feature.
The Kinetix SDK has been built around the User-Generated Emote feature, with simplicity in mind. The purpose of the SDK is to provide all the technologies, features, and scripts to integrate seamlessly the User-Generated Emote into any game.
The SDK's Core Package includes all the mandatory technologies and features a game needs to implement and leverage the User-Generated Emote feature at its fullest potential.
Kinetix has developed its SDK to be easily plugged with any avatar-based 3D project:
No external server stream dependency. We share data packages your netcode can interact with. No need to be always connected with Kinetix's servers (learn more: Kinanim (Emote streaming)).
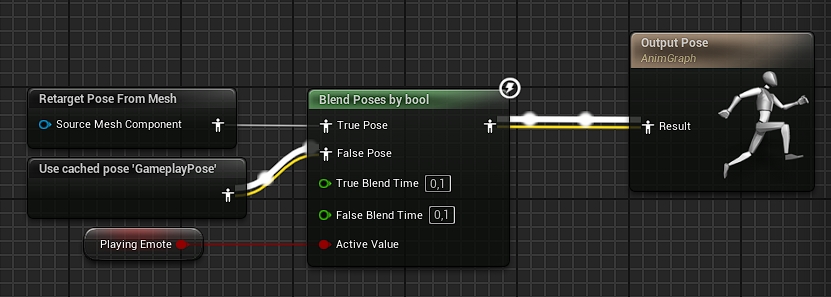
It works with all animator systems. We generate animation at runtime for any avatars. You can play it by default as we override the animator’s system or plug it to your custom system (learn more in Animation System - Unity & Animation System - UE).
The SDK matches with your design. Every modules' UI are provided as examples, you can customize them and create yours from scratch.
Kinetix SDK is designed to seamlessly interface with any existing game infrastructure without interfering with Client or Game tech capabilities:
Kinetix servers are handling most of the effort with content creation, storage, management, and optimization.
Clients only carry the SDK - Core Package modules, essential to the SDK.
Game server only handles the relay of serialized pose.
In both cases, you will be able to have the user-generated emotes directly retargeted on your users' avatar(s). To do so, you have to upload your avatars on .
Feel free to if you are not sure about what networking system your game needs.
UGC Management platform: on the Kinetix , once the User-Generated Emote feature is integrated, you will be able to manage the emotes generated by your players.
If you need help to choose between the SDK and the API, do not hesitate to contact our technical team! You can reach out to , he will get quickly back to you!
Before you go further, please ensure that you have installed all the dependencies from our .
to always play high-quality emotes on any humanoid avatar, with constant level of performance.
to deliver a great in-game experience by dynamically managing memory and synchronizing the avatar poses.
to easily manage the way emotes are attributed to your players, and synchronize metadata.


To start leveraging the Kinetix SDK in Unity, you will need to install Git and all the required dependencies.
Dependencies are not included in the Unity's package.
To import dependencies, access the Unity Package Manager (Window -> Package Manager), click the "+" button, and select Add Package from git URL.
Here are the dependencies to import (copy and past the links) :
Newtonsoft (Compatible with any version)
[com.unity.nuget.newtonsoft-json]
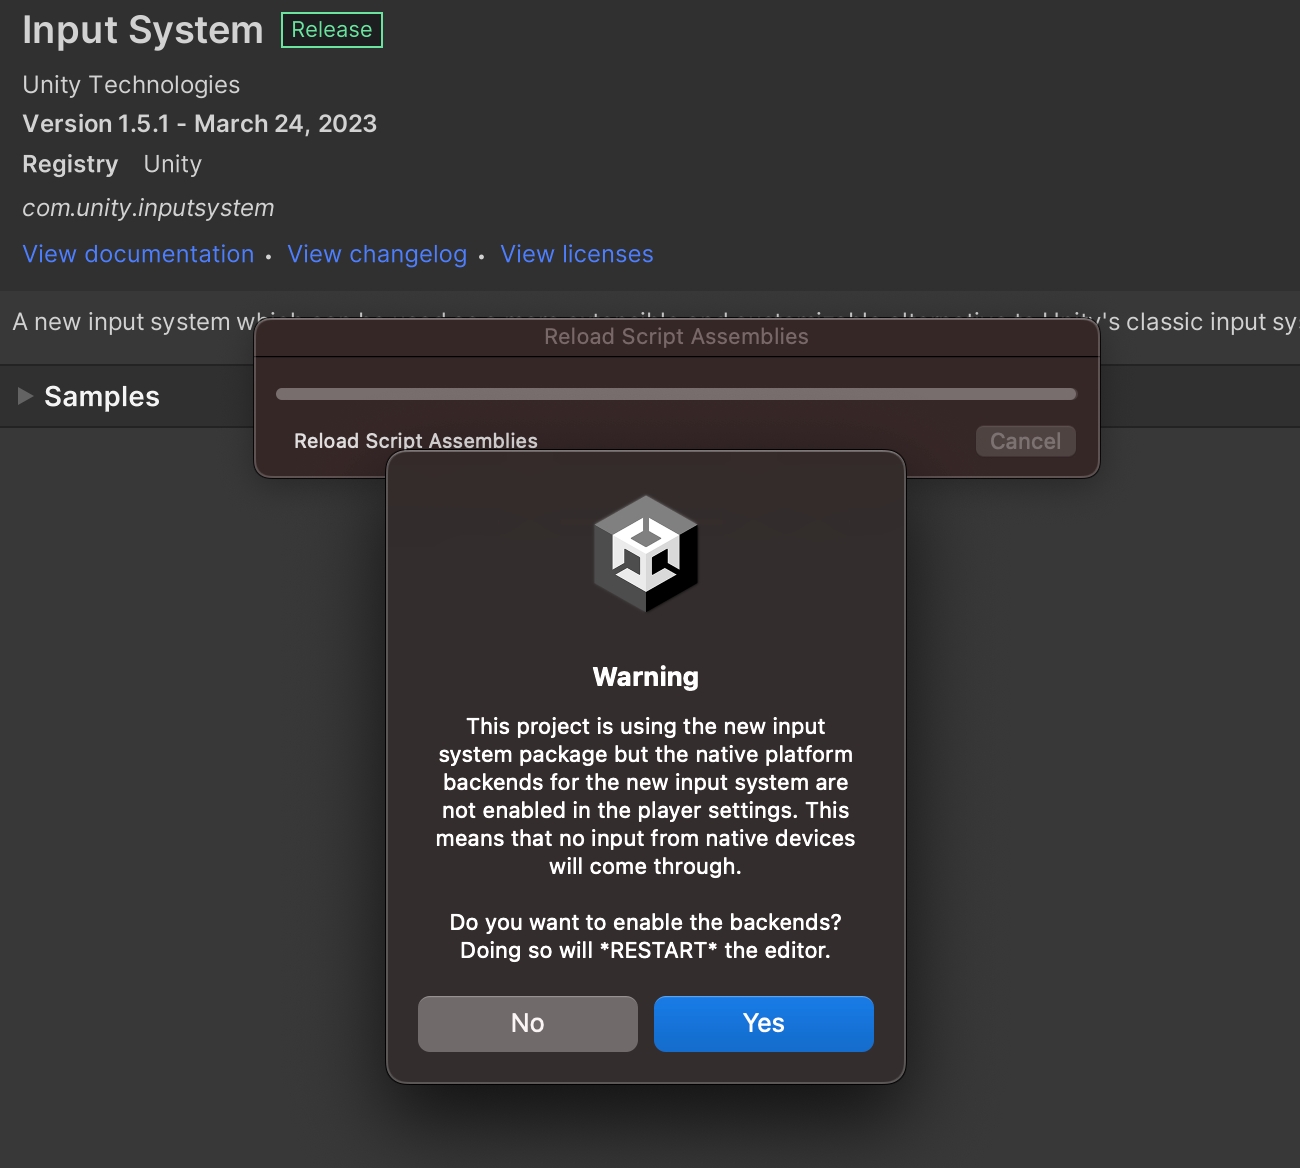
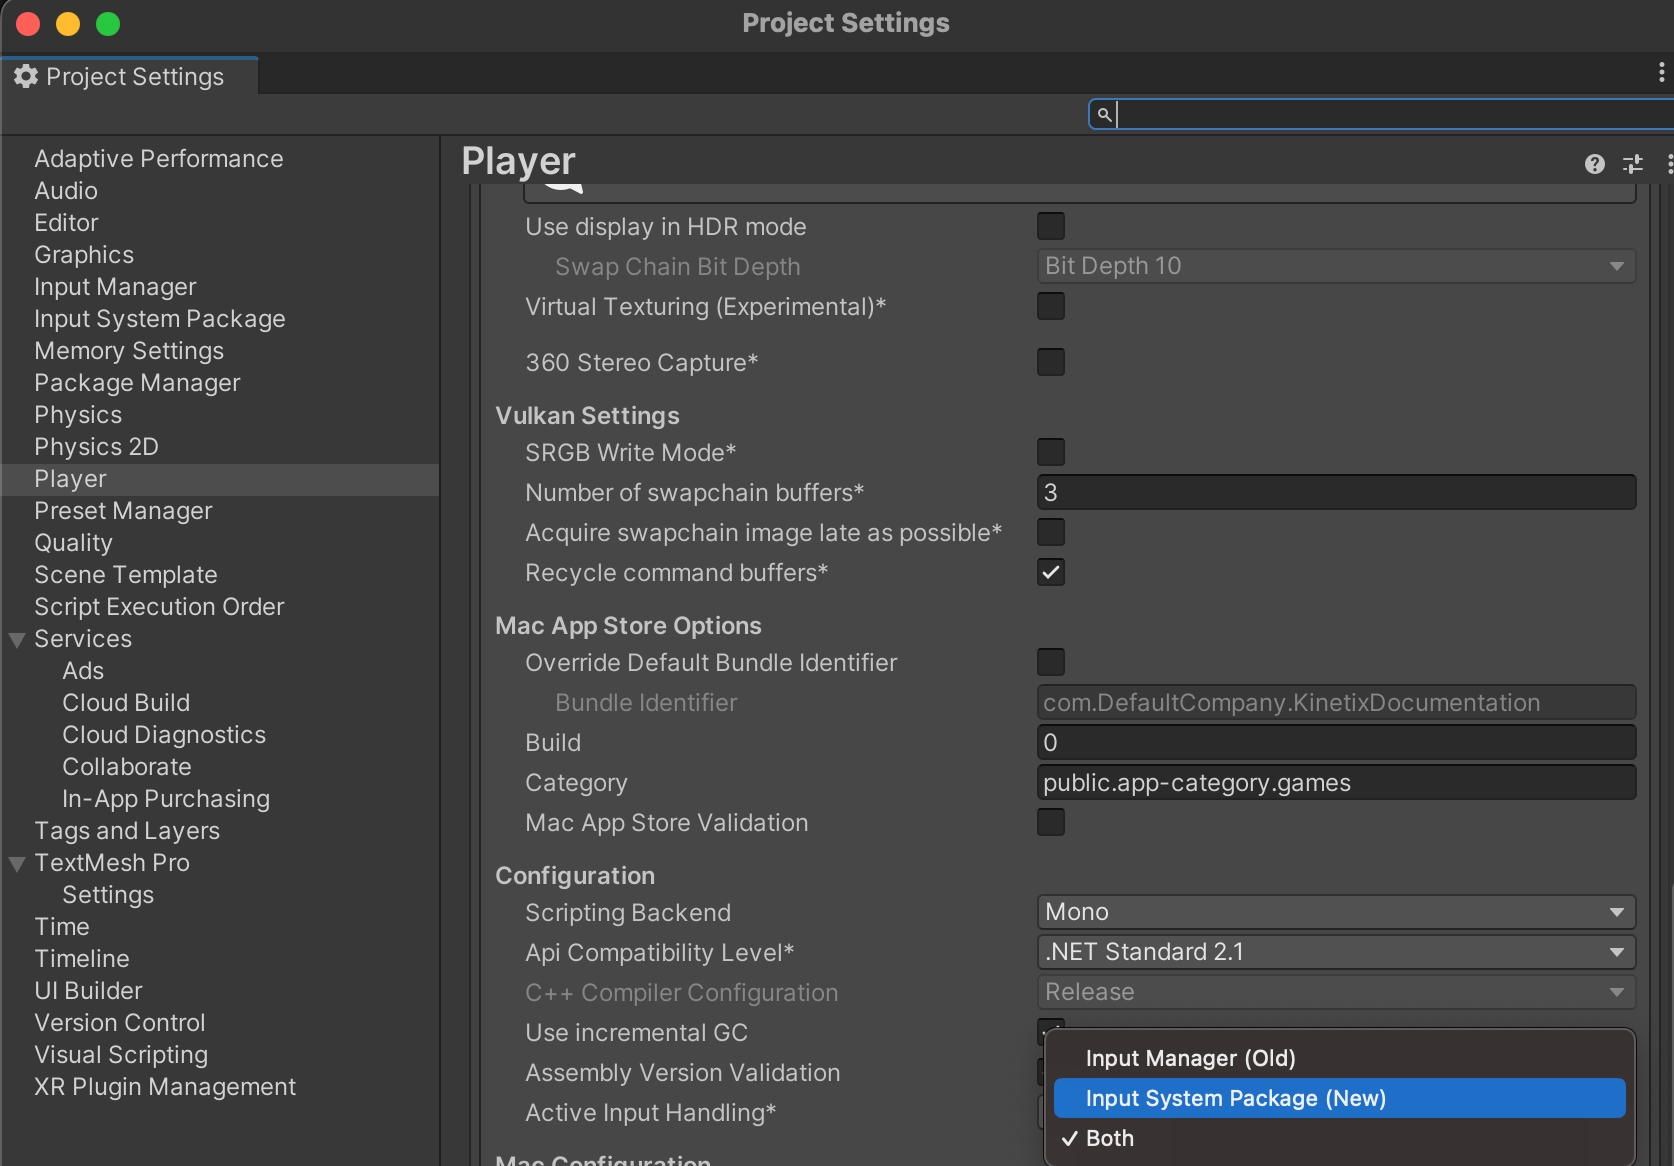
Input System
[com.unity.inputsystem]
While adding the Input System package, you may have a warning popup, select Yes.
As our UI uses new Input system, verify that your "Active Input Handling" is set to "Input System Package (New)" or "Both" in "Edit/Project Settings/Player/Other Settings/Configuration"
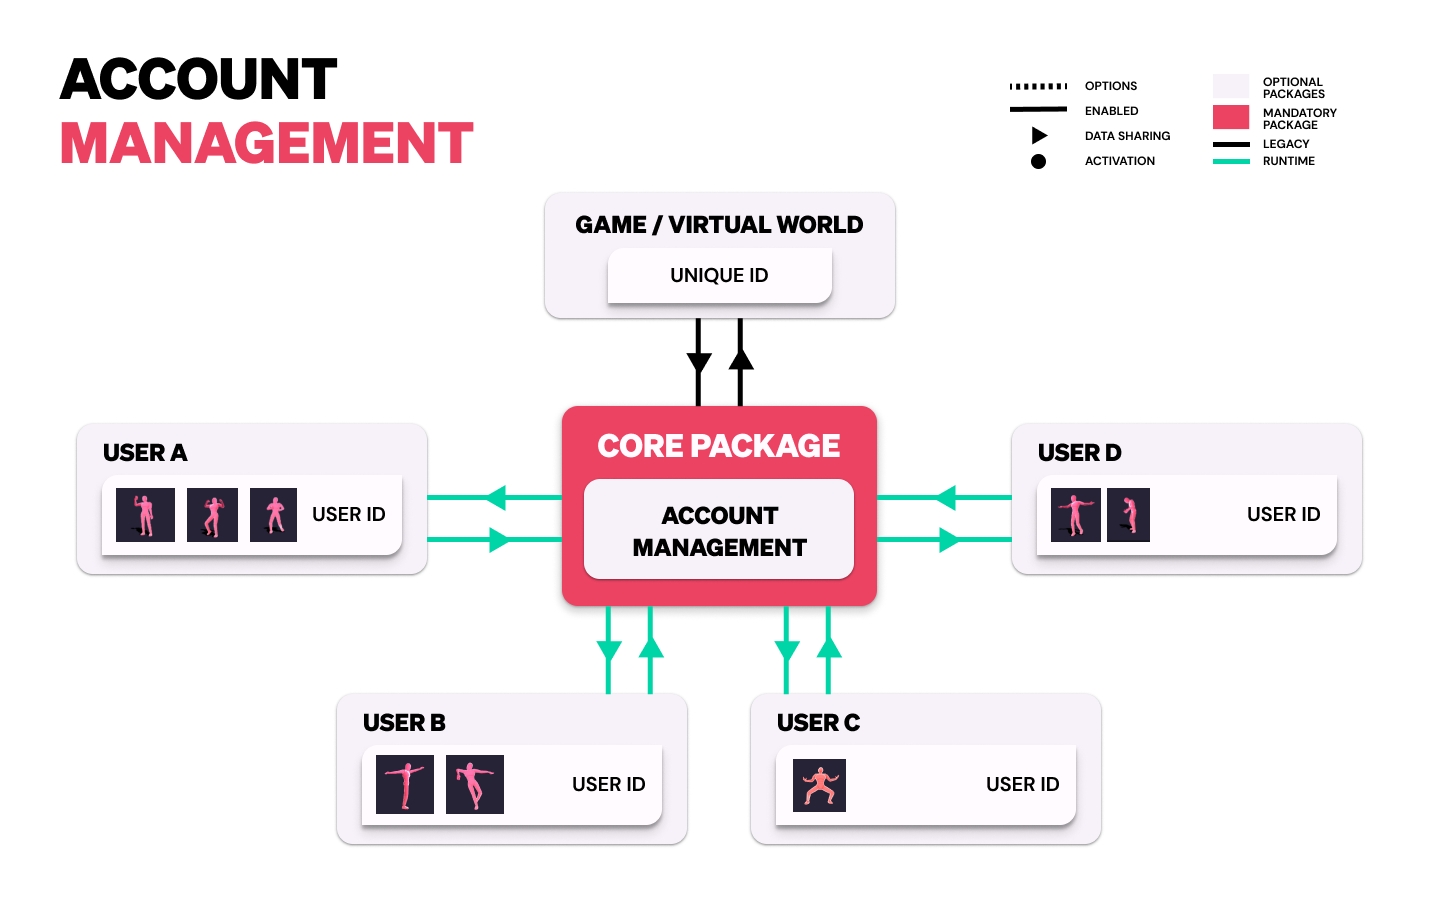
Learn how to manage your players' accounts and their Kinetix emote content.
You need to create a unique and immutable _UserId for each of your users. You can for example use the UserID of the distribution's platform, but it can also be any unique chain of character of your choice.
Each time an user logs in with their email or username in your game, call:
And each time an user logs out, call:
The account module of our SDK only accepts one user at the time. Any attempt to log in another user will disconnect the previous one.
You can retrieve manually the user's emotes through the API of the core package via this method :
Please note that the number of Kinetix emotes fetched for a single user is currently limited to 1000 emotes
Check that your Unity version is supported .
needs to be installed to fetch the Unity packages through the Unity Package Manager.


Prepare the Kinetix's SDK integration in Unity.
Check out the tutorial below to get quickly started with the Kinetix SDK integration in Unity. For the Chinese version, click !
The Kinanim format is engineered to elevate gaming experiences and optimize in-game performance, through intelligent emote streaming, efficient caching, and advanced retargeting capabilities.
Kinanim is a groundbreaking file format developed by Kinetix, designed to revolutionize the way emotes are streamed in multiplayer games. It introduces a smart network-based caching mechanism that optimizes bandwidth usage, reduces server load, and enhances the overall gaming experience. With Kinanim, Kinetix can efficiently stream a large quantity of emotes, providing players with a seamless and responsive emote experience. Furthermore, Kinanim incorporates emote retargeting, making it a powerful all-in-one tool.
Network-Based Emote Streaming: Kinanim uses a network-based streaming approach to efficiently deliver emotes from Kinetix's servers to the SDK. It streams emotes in smaller, sequential portions, reducing the need for simultaneous data transmission of entire emotes.
Optimized Bandwidth: The network-based approach significantly optimizes bandwidth usage, ensuring that emote streaming is efficient and does not consume excessive data. Also, Kinanim alleviates the server load by selectively sending emote segments as requested, resulting smooth Emote stream for multiple simultaneously played emotes.
Great Responsiveness: Our system enables close to instantaneous responsiveness in emote streaming, allowing players to use emotes promptly without noticeable delays.
Kinanim operates by streaming User-Generated Emotes from Kinetix's servers to the SDK, which will manage the attribution of the emote to the player's cache. When a player plays an user-generated emote, his client will not directly receive and read an animation file, but will rather receive portions of it through the SDK, including the specific character (avatar), that are transmitted via the network to their device in real time. Also, when a player plays an emote, the surrounding players will also download the played emote retargeted on the player's avatar so that everyone one will see the emote correctly.
In addition to this mechanism, the SDK includes a valuable feature that caches the most recent emotes played by the player. This feature from the SDK saves these emotes in the player's cache, reducing the need for repeated streaming of recently used emotes. By efficiently caching recent emotes, the SDK optimizes the player's experience and conserves both bandwidth and server resources.
This network-based streaming minimizes bandwidth usage and server load, ensuring that the emote is displayed promptly and without interruptions.
No need to hardcode thousands of emotes in the game, which would result in very heavy game files.
All networking is handled by Kinetix (costs & know-how)
Kinanim ensures that emotes are displayed promptly and without interruptions, enabling players to interact with one another in real time.
Players can own and play thousands of user-generated emotes with a simple push of a button. They do not necessarily need to select a few emotes to embed in an Emote Wheel as in Fortnite, for example.
With Kinanim, game developers can take their multiplayer gaming experience to the next level by providing efficient and responsive network-based emote streaming with emote retargeting, enabling players to customize their emote experience without affecting the game's performance.
Initialize the Kinetix Unity SDK, has to be done to be able to call its API
The initialization of the Kinetix SDK should only be done ONCE when the app starts
If you have an error saying that the Kinetix namespace can't be found, find the Kinetix Core package in the Project tab and right click on it > Reimport
You can initialize the SDK with parameters in the KinetixCoreConfiguration :
GameAPIKey => Game API Key, obtainable via Dev portal
PlayAutomaticallyAnimationOnAnimators => true if you want the SDK to handle the animator.
EnableAnalytics => true if you want to help us and share general informations of how users use our SDK.
ShowLogs => true if you want to log the behaviour of the SDK for debug purposes.
EnableUGC => true if you want to enable UGC
NetworkConfiguration => Customize network configuration
CachedEmotesNb => Number of emotes cached in storage (0.5 MB / emote)
SDK Integration if you are using the official animator system from Unity.
Our SDK offers functions in order to handle smoothly Unity's Animation system.
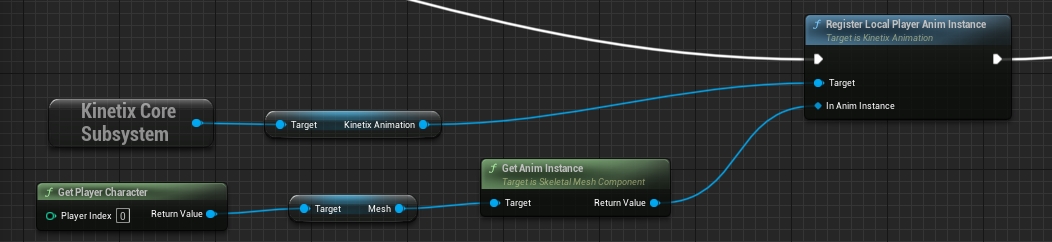
To register/unregister your local player animator :
To stop animation on local player :
To register/unregister remote peer animators :
Then, when registering your local player, you can pass the UUID of one of your uploaded avatar, this will allow the SDK to automatically use your custom retargeted emotes.
In addition to the local player or remote players, you can also register other avatars (to animate your NPCs or shop avatars for example)
The registering of the avatar returns a string representing the unique Id (UUID) to pass as parameter to the subsequent functions.
You then load the animations with the avatar UUID
And play the animation with
To get the Duration of an emote, you must first get a KinetixClip object. You can easily get it via the code sample
Please note:
You can have the duration in the OnSuccess callback
The OnComplete callback ensures the full clip is available
Learn more about our Animation functions in
Learn more about our Network functions in
First, check to get the UUID of one of your uploaded avatar.
Learn how to seamlessly integrate the Kinetix SDK with your own Animation System for Unity.
To register/unregister your local player avatars:
Get callbacks to get informed when an animation is played on local player:
To retrieve AnimationClip Legacy to and play it in your system for your local player:
To register/unregister remote peer avatars:
Get callbacks to get informed when an animation is played on remote peer:
To retrieve AnimationClip Legacy to and play it in your system for remote peer:
In addition to the local player or remote players, you can also register other avatars (to animate your NPCs or shop avatars for example).
The registering of the avatar returns a string representing the unique Id (UUID) to pass as parameter to the subsequent functions.
You then load the animations for the avatar UUID:
And play the animation with:
The SDK's Core Package includes all the mandatory technologies and features a game needs to implement and leverage the User-Generated Emote feature at its full potential.
When designing our SDK we focused on developing features that make you save time and allow you to easily integrate the User-Generated Emote feature within your game. Each of the Core Package modules are flexible so they match with any dev environment.
Learn more about the SDK's 3 Core Modules inAnimation system, #smart-networking & Account management.
When loading a humanoid avatar, Kinetix's Core Package calls the associated user-generated emotes to handle the retargeting. The process consists of downloading the GLB file of the emotes and retargeting them with the registered avatar to generate Legacy AnimationClips that perfectly fit your avatar(s). The retargeting process is optimized to keep a constant frame rate of your application. Each time a new emote is loaded, it is added in the queue of the retargeting module and perform N actions per frame.
To avoid the conflict between generation of humanoid AnimationClip at runtime and the Animator, we developed a proprietary Animation System composed of "KinetixCharacterComponent", "ClipSampler" and "BlendAnimation" scripts. They are automatically added at the GameObject (Unity) / Actor (Unreal Engine) of your animator when you initialize your SDK.
That way, when a player triggers a user-generated emote in-game, our Core Package samples at runtime the pre-generated AnimationClip. It guarantees to always play high-quality emotes with constant level of performance. Once you have registered your animator, (Unity's animator, Unreal Engine's animator or custom animator) this process becomes seamless.
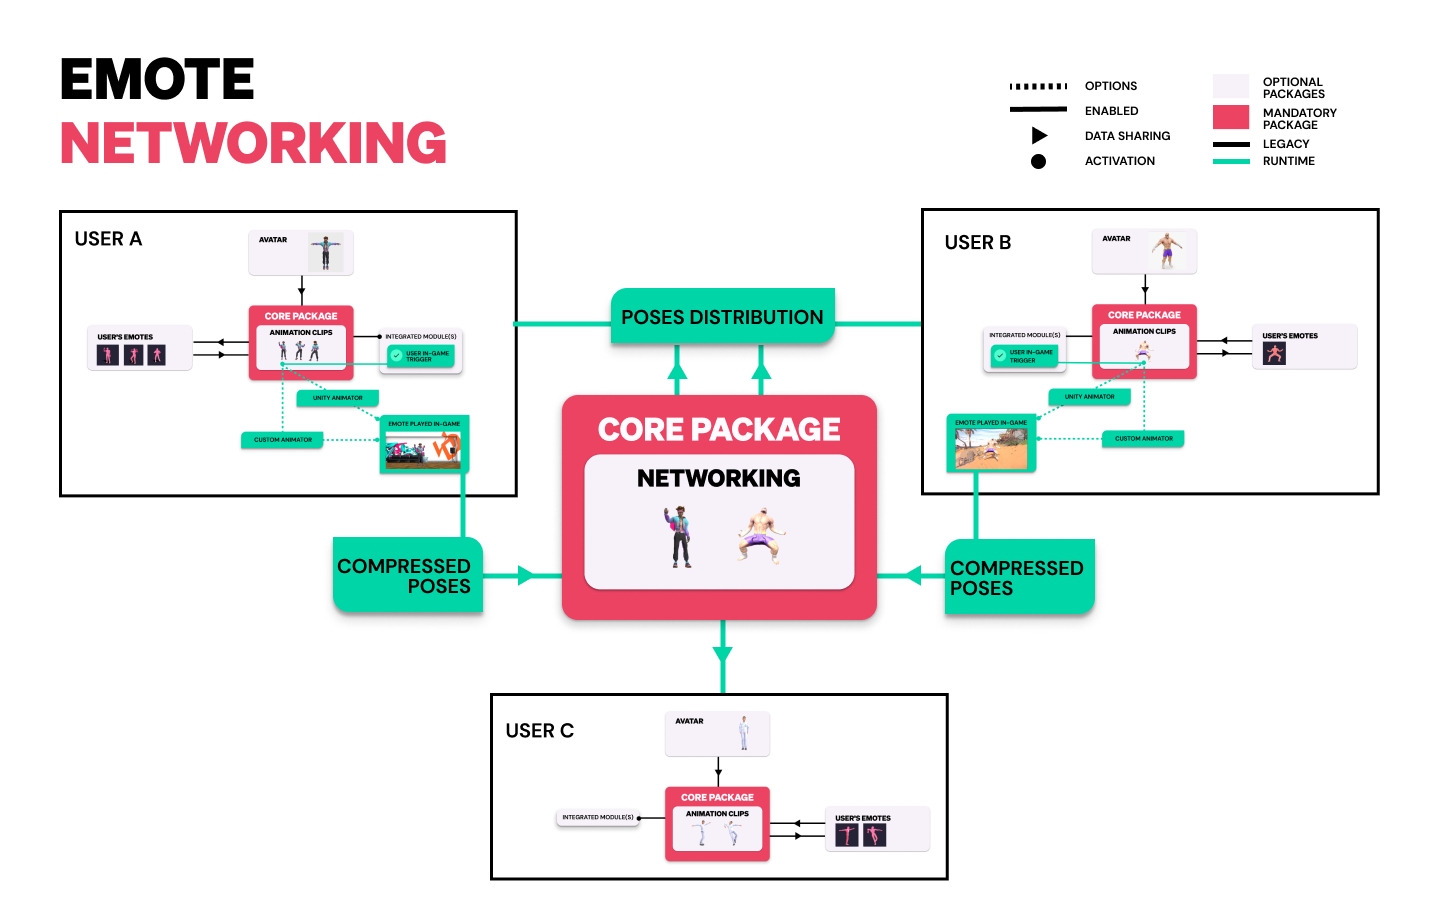
Adding dynamically and playing multiple emotes simultaneously can be very tricky issue: in the vast majority of games, it's not possible to store thousands or millions of user-generated emotes in player's cache or to hardcode the emotes files, which leads to storing emotes on a cloud.
The concept is to cache the Peers ID by registering them via our SDK. A KinetixCharacterComponent is added to local and remote players. Using a simple implementation, you will be able to get the current pose of the local player and apply it to the remote player.
To ensure real-time communication between clients our solution compresses the volume of messages that are shared by only serializing poses from played emotes. This technique is +200 times more lightweight than sharing emotes files, and allows multiple players to play and see user-generated emotes simultaneously.
Managing and distributing the right content to the right gamer usually takes a lot of time and implies custom developments.
Kinetix's SDK include an Account management solution to fetch user-generated emotes and their data with players while guaranteeing their data privacy. It facilitates content distribution and monetization for game studios / developers while ensuring that players will easily retrieve their user-generated emote in their inventory in-game in a seamless way.
This Account management module also lets you track user-generated emotes usage metrics and optimize emotes distribution in your game accordingly (all metrics accessible from Developer Portal).
One of the many challenges developers face when integrating emotes or animations in game is to play them on any avatars. It is even more complex when a game or 3D digital world includes different avatars, with eventually different skeletons. At Kinetix, the user-generated emotes are created on Kinetix's Standard Avatar. To play them on your custom avatar, we have developed a proprietary algorithm that transfers any 3D animation (emote) to any 3D humanoid character, and fits with any animator system (Unity, Unreal Engine, and custom animator systems).
Head over to & to learn more and integrate.
Head over to to learn more. Configure the network for your game: - -

In this section, you will learn how to initialize the Kinetix's SDK Core Modules in your Unity application with our Core functionalities.
Synchronise the Kinetix emotes for your players with our server agnostic solution.
When you play an animation, the event KinetixCore.Animation.OnAnimationStartOnLocalPlayerAnimator will be fired.
It allows you to use a callback to then pass the ID of the emote played to your network layer, and, using a RPC or a Sync Variable, to trigger the animation on the KinetixCharacterComponentRemote (see below).
For more information about the whole strategy, you can visit Kinanim (Emote streaming) and Emote networking & caching.
Once a remote peer connects in your same room or is already connected in the room, you can register them by giving their peer network IDs as argument, and their animator:
Then get and store the automatically added KinetixCharacterComponent
Once a remote peer disconnect in your same room, you can unregister them by giving in argument their peer network ID.
Once a the local peer disconnect of the room, you can unregister all remote peers.
We differenciate 2 types of KinetixCharacterComponent: Local and Remote. It's today mostly for semantics, as a Remote KCC will have the same capabilities as the Local one, but represents a Remote Peer.
Get your Game authentification API Key from Kinetix's Developer Portal to link your game with Kinetix technologies.
There are 2 types of Keys:
Limited - Free key used for tests and pre-production purposes. You won't be charged anything using that key in a pre-prod environment. Note that with a Limited key, the number of User-Generated Emote you can create is limited, to avoid issues.
To request an authentification Game API Key on the Developer Portal, you need to have a game space created. If you do not already have a game space created, head to your dashboard, and create your game space by clicking on "Create a game".
Then, click on the "Get API key" button, below "Activate your Game/App API Key.
Copy and save your Game API Key. You will have to use it soon!
CAUTION: your Game API Key will be displayed only once. It is crucial that you copy and save it before closing the pop-up, otherwise you will have to restart the process!
Get started with the Unity SDK in under 10 minutes.
Next, we'll finalize it to provide you with a complete template for integrating UGE into your game:
Let's review the different steps of the code together!
Before Initializing the SDK (which is an asynchronous process), you can register a callback to call subsequent functions of the SDK:
Then, you can initialize the SDK with the configuration you want:
Your character has to be an humanoid
We will focus on this part of the code:
We use the ConnectAccount method, establishing a link between the user account on your end and within Kinetix's system.
The userID you give to Kinetix must be reused each time you want to connect this specific user, and it must remain exclusive to them.
While it can be a hash or any string, we highly recommend anonymizing user data and refraining from incorporating any personal information.
Let's check the following code (inside the success callback of ConnectAccount)
As you can see, we provide a way to know when a link / token to the Web Application is invalid (either because of the security token expiration or after usage).
To get your player's emotes, you can call GetUserAnimationMetadatas, which will return an array of AnimationMetadata, containing all the info you will ever need (name, thumbnail, file links, etc...)
As you can see you can get the Id of an emote by accessing the Ids.UUID property of an AnimationMetadata
Once we have the id of the emote we want to play (and the local player has been registered), we can just call:
Kinetix's SDK uses API keys to authenticate Emote requests. You can view and manage your API key in the .
Register on to generate your Game API Key and start leveraging Kinetix's User-Generated Emote feature.
Unlimited - Free key used for production purposes. Access to the key is free but depending on your usage you might be charged based on our policy. To obtain an Unlimited key, head to your dashboard on the Developer Portal, and click on "Upgrade to Unlimited", in the "Monitoring" section.
If you followed the section, your script should look something like this:
More info:
To play emotes, you can use an already configured character from your game which has an animator for exemple (custom animation systems are supported, please visit for more info) You can call the RegisterLocalPlayerAnimator method to easily register a character
If you uploaded an avatar in our , you can also pass the avatarID matching the player character you registered to benefit from the Contact-Aware Retargeting.
More info:
More info:
You can then call a method to get the link to the Web Application, and attach it to a script to open the web browser (for example with )
More info:
More info:
More info:
You should be ready to use the SDK now! We encourage you to visit to expand your knowledge of the SDK or our to check what methods are available.

Our SDK allows comprehensive control over user-generated emotes with features such as trimming animations, pausing/resuming, setting elapsed time, modifying play rates, and looping animations. Note that these features are not automatically networked; you must send the relevant information over your network layer and call the appropriate methods using our "Remote implementation."
Please note that these features aren't automatically networked. You have to send the information over your network layer, and call the relevant methods via our "Remote implemenation"
Trimming animation allows you to choose a part of the emote to be played, instead of playing the whole one. Remove a part of the start of the animation, at the end of the animation or both simultaneously.
Example:
Let's say the emote is 10 seconds long and you want to play the animation from '3:00' to '5:00'
Example 2:
Let's say the emote is 10 seconds long and you want to play the animation from 3:00 to the end of the animation.
Example:
Let's say the emote is 10 seconds long and you want to play the animation from '3:00' to '5:00'
Example 2:
Let's say the emote is 10 seconds long and you want to play the animation from 3:00 to the end of the animation.
Example:
Let's say the emote is 10 seconds long and you want to play the animation from '3:00' to '5:00'
Example 2:
Let's say the emote is 10 seconds long and you want to play the animation from 3:00 to the end of the animation.
Resume and pause the playing of an emote, freezing the player avatar. The SDK will keep its state. (elapsed time, loop mode, play rate, animation timeline, etc...)
If _Paused is true, the SDK will pause the emote.
If _Paused is false, the SDK will resume the playing of the emote.
If _Paused is true, the SDK will pause the emote.
If _Paused is false, the SDK will resume the playing of the emote.
Example:
If _Paused is true, the SDK will pause the emote.
If _Paused is false, the SDK will resume the playing of the emote.
Example:
Enables you to go to a certain time of the sampler. The elapsed time is expressed in seconds.
Example:
Example:
Modify the speed at which frames are read by the SDK. A negative number will make the SDK play the emote backward.
The SDK depends on the UnityEngine.Time.timeScale
Example:
Example:
Example:
Enable or disable loop mode for a player. When loop mode is enabled, the SDK will loop back to the start / end of the animation (depending on the playrate's sign)
Example:
Example:
The purpose of this page is to lead you through the integration of the User-Generated Emote feature using the Kinetix SDK API.
Using Kinetix Core, get the link to the Web Application that will let your players upload or record their video
Once in the web application, gamers can either record or upload a video to create their own Emote.
Once the video is uploaded, gamers can trim the portion of video they wish to extract to create their emote
After trimming the video, gamers can give an name to their emote, specify its suitability for a mature audience (avoiding any trolling, sexual or hateful behaviors), and consent to the Terms & Conditions.
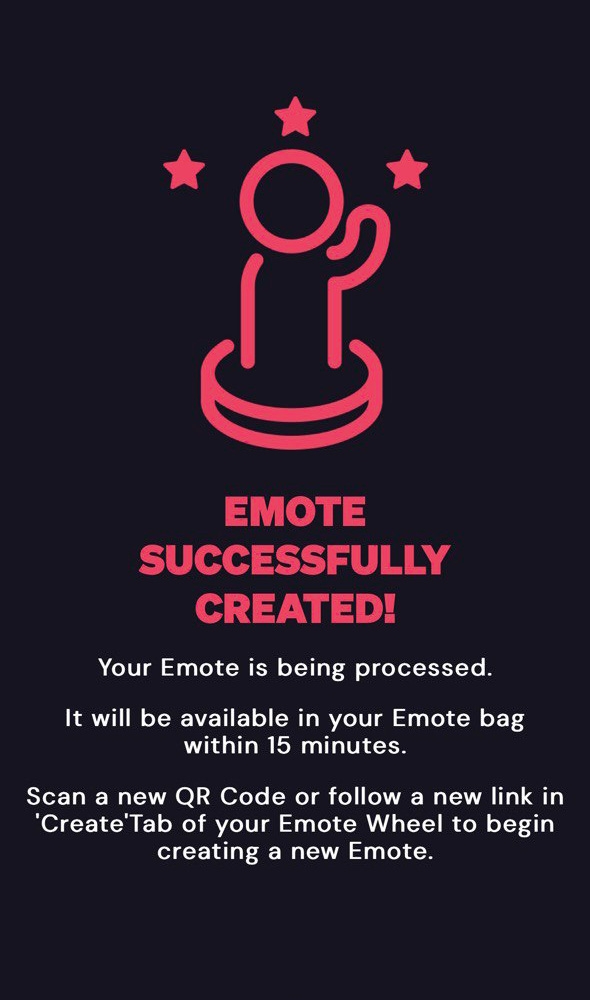
Et voilà!
After successfully submitting the Emote, gamers can return to playing the game and wait for the end of the processing of the Emote (average wait time: 5 minutes).
The emote will be available automatically when fetching the user's emotes via
If you want to let your gamers create their own Emotes, you can either use the SDK exposed methods or use our Web API endpoints:
Please make sure to read first

The goal here is to propose an implementation of the Root Motion system for controllers using a NavMeshAgent.
Please note that this feature is experimental and may require some adjustments on the implementation to work.
In this exemple the player controller is organized as follow:
PlayerObject (contains the NavMeshAgent and the script VisualAvatar)
AvatarObject ("root" -> contains the Animator)
Mesh
Armature
Hips
When used, the root motion will transfer any movement of the Hips to the AvatarObject (the root).
The script VisualAvatar is responsible for updating the position of the PlayerObject from the position of the AvatarObject (see below)
Please note 3 things here:
m_visual is the transform of the AvatarObject
The position update must be in LateUpdate, as the Root Motion system operates in the Update state of Unity
In a networked environment, we want to set the position of the PlayerObject only if we are the owner of it
Remove a part of the start of the animation. Remove a part of the end of the animation. Or both simultaneously.
Pause the playing of the animation, freezing the avatar in place
Go to a specific point of the animation (in seconds)
Speed at which animation is played. Can be set to negative in order to play the animation backward
Enable or Disable the loop mode of the Kinetix-Animator
Exemple of Photon Fusion integration
This example only works in SHARED game mode
Root motion, if enabled, makes the parent object (the one with the Animator component) move instead of the hips of the armature. This allows collision detection in the implementation of the character controller.
Please note that this feature is experimental and may require some adjustments on the implementation to work.
Root motion is enabled for a character via the following overloads when registering the players' animators:
And
Example of configuration:
A few options are available :
ApplyHipsYPos => Sets the root Y position to be the hips Y local position
ApplyHipsXAndZPos => Sets the root X and Z positions to be the hips X and Z position
BackToInitialPose => If set to true, the avatar will revert to its initial position when the emote has finished playing
BakeIntoPoseXZ => If set to true, the emote will be played in place for the X and Z axis, meaning the avatar won't move horizontally during the animation
BakeIntoPoseY => If set to true, the emote will be played in place for the Y axis, meaning the avatar won't move vertically during the animation
Create an Avatar mask.
Follow these steps in project view :
Right Click> Create > Kinetix > AvatarMask
In the inspector, you can click on each individual node to enable (in green) or disable (in red) the bone. Hovering the node will show the name of the bone.
For the Mask to be applied on a character, you need to call the corrisponding SetMask method.
Example:
Example:
The KinetixMask can be modified in runtime using the method SetEnabled
Example:
Exemple of Photon PUN integration
PhotonConnectManager is a global script attached one time to get information if the local player joined a room and then instantiate its prefab.
Player is a script attached to the player prefab and will register and unregister if its local player or a remote player.
Reference for the Kinetix Core SDK.
This page is about a beta feature, that may not be stable yet
Our SDK allows inverse kinematic control when playing a kinetix animation. The IK has multiple features such as :
Hint (or "Pole Vector"): These are positions like "left knee" or "right elbow" used by the IK to orient the elbow or knee in the correct direction.
Target: These are, as their name suggest, the target position and rotation for a hand or foot.
Auto-retargeted hand and foot rotation : Our IK ensure that if you have multiple rigs in your virtual world, the IK rotation will be the same for both characters.
Adjust Hips : This feature let you lock hands or foots into place by moving the hips
The IK target rotation is described as follow : For the hands, the forward vector points toward the fingers (we average each finger to get a forward direction). The down vector points toward the palm of the hand.
For the feet, the forward vector points toward the toes, parallel to the ground. The down vector points toward the knee. (based on the T-Pose)
Registering the OnBeforeIkEffect allows you bind to the Update of the Kinetix Animator before any IK is computed. This allows you to check for collisions or grounding and use IK methods.
Example:
Example:
Position weight showcase :
Position weight showcase :
These are positions like "left knee" or "right elbow" used by the IK to orient the elbow or knee in the correct direction.
Our IK ensure that if you have multiple rigs in your virtual world, the IK rotation will be the same for both characters. The global rotations are described as follow :
Rotation (and position) weight showcase :
Rotation (and position) weight showcase :
Rotation (and position) weight showcase :
This feature let you lock hands or foots into place by moving the hips
This example is based on
The IK target position use the root game object you provide us when in order to convert from global context to the avatar context.


This page is about a closed beta feature, get in touch with us if you wish to be part of the program and enable the validation flow.
Once the validation flow is activated, created emotes must be validated before appearing in the user's "bag" (KinetixCore.Metadata.GetUserAnimationMetadatas)
Validating an emote will make it retrievable via the user's account (KinetixCore.Metadata.GetUserAnimationMetadatas)
Before validating the emote, you may want to show it to the player:
If a user is unsatisfied with their emote, you can allow them to replace it with a new emote, invalidating the previous process and restarting the flow from the begining with the old process as a parent.
Once installed, you can follow these steps to integrate it and open the Kinetix PWA:
Grab the prefab "CanvasWebViewPrefab" from the demo scenes of the plugin
Use the following code to get the PWA url and open it
Detecting the end of the flow in the PWA can be done in a variety of ways, but the simplest is to poll the user's processes to detect if a new emote is being processed
To detect a new valid Process, you can check the length of the processes after filtering them thanks to the property CanBeValidatedOrRejected
Although the PWA can be opened in a new browser tab (with Application.OpenURL for example), we recommend finding a way to embed it directly in your app for UX reasons. As an example, we will demonstrate using the plugin "3D WebView for Android and iOS (Web Browser)" ().
OnUpdatedAccount
None
Called upon updated informations on account.
OnConnectedAccount
None
Called upon connected account.
OnDisconnectedAccount
None
Called upon disconnected account.
ConnectAccount(
string _UserId,
Action _OnSuccess = null,
Action _OnFailure = null
)
void
Connect account with UserId
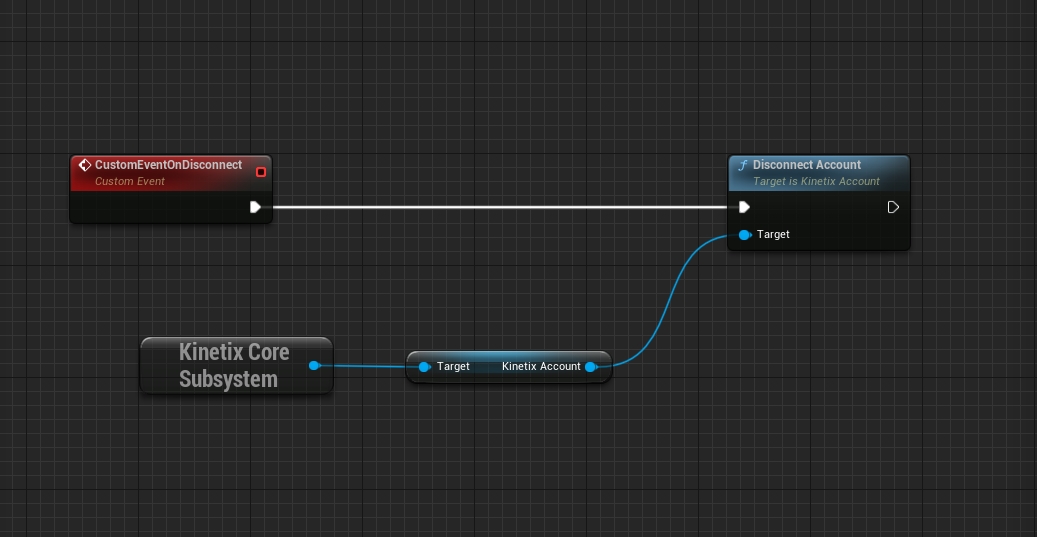
DisconnectAccount()
void
Disconnect connected account

This main class is used for SDK initialization.
Added:
Improvements on Animation Load methods allowing you to get the loaded KinetixClip and know when the full emote is downloaded and ready to use
_____________________________________________________
Added:
Kinetix Mask now allows you to select parts of the avatars that you want to stop the animation on
You can now pass an avatar separately from the animator, allowing more compatibility with projects requiring a Generic avatar
Added more samples for IK and Validation flow (still in beta)
Fixed:
Loading multiple animations at the same time no longer assign the same data to all
SDK now fully functions with SynchronisationContext.SetSynchronisationContext
_____________________________________________________
Added:
_____________________________________________________
Fixed:
RetakeEmoteProcess now passes the full URL for the PWA instead of just a token.
_____________________________________________________
Added:
Manual cache clearing for UGC Url
Fixed:
RootMotion not applying
_____________________________________________________
Fixed:
Animator not being enabled back after emote being played
_____________________________________________________
Added :
[Closed Beta] Integrated API routes for validation and retake
Download of emote file now scales with the user's bandwith, allowing for a better control
Fixed:
SDK now allows for blendshape editing while animation is playing
_____________________________________________________
Added :
_____________________________________________________
Added :
Custom retargeting emotes are now loaded with their own thumbnails
Removed :
Obsolete method AssociateEmotesToUser
Alias features
_____________________________________________________
Fixed :
Edge case where an emote could not be played a second time
_____________________________________________________
Fixed :
Fixed Demo scene script wrong "using" statement
Fixed assembly loading bug
_____________________________________________________
Fixed :
Demo scene is now in the samples
Fixed a wrong "using" statement
_____________________________________________________
Added :
SDK now fully supports in-house kinanim format, allowing Emote streaming.
New networking implementation, easier and removing most costs on the game developper's side
Removed :
Support for Emote Wheel UI
Support for Alias and Contextual features
_____________________________________________________
Added :
SDK now fully supports Contact Aware Retargeting implementation: upload your avatar in the Developer Portal.
Fixed :
Fixed an issue where a specific rig hierarchy could cause a crash
_____________________________________________________
Added :
Alias system to fetch emotes directly from portal via aliases.
_____________________________________________________
Added :
Added Multi Character management to play animations on your avatar, NPCs, or within your in-game shop
Added Smart Cache to avoid overloading the storage
Updated :
Improved Retargeting performances
Fixed :
Fixed an issue of transition through the ground on some edge cases
_____________________________________________________
Updated :
Fix and improvements on Legacy AnimationClip behaviours
_____________________________________________________
Updated :
Global Core Refacto and Stabilization
Improved Ground Contact in Retargeting System
_____________________________________________________
Fixed :
It's now possible to call UnregisterLocalPlayer just after registering it.
We have added a safeguard after multiple register on LocalPlayerCharacter and RemotePlayerCharacter.
Fixed an issue that didn't dispose components on GameObject while calling UnregisterLocalPlayer.
_____________________________________________________
Fixed :
Improved general stability on fetching emotes
Improved Gamepad Controller behaviours
_____________________________________________________
Added :
Context Module to play emotes on specific context
Fixed :
Misc bug fixes and performance improvements
_____________________________________________________
Added :
Create UGC Emote with Companion in the new Create tab
Assign Verified Emotes to your users
Web2 user account handling
Kinetix SDK API interaction
Hide/Show Emote Wheel tabs
Updated :
New batch of 3 test Emotes
_____________________________________________________
Updated :
Improved retargeting on high ratio avatar differences
Removed "Open" action from Input Action Map
_____________________________________________________
Added :
Kinetix Package Manager to install modules of the SDK (Core, UI Common and UI Emote Wheel)
New Input system compliancy and new Input Customizer that let you customize inputs for any controllers. We do now support GamePad from scratch in addition to Touches and Mouse Input.
New example Photon Fusion for the network system integration
Updated :
Full rework on the network system that increase scalability and memory usage.
Update From 0.4 :
We have reworked the Network System for scability concerns. We have removed methods that allow to play an animation on remote peer. You can now synchronize the frame poses directly through your network system by using our Serializer and Deserializer (You can read more informations on Network Synchronization part)
We have removed the parameters MaxPersistentDataStorageInMB and MaxRamCacheInMB in KinetixCoreConfiguration for flexibility. By using our UI Emote Wheel, emotes will be free from memory by design. Otherwise you can call the Unload method in our API to free the memory.
_____________________________________________________
Fixed :
UGC emotes are now centered on the avatar
Pages Label on the inventory is now refreshed
The error "'Animator' does not contain a definition for 'keepAnimatorStateOnDisable'" has been fixed.
_____________________________________________________
Added :
Root Motion System
UI Customization (Light Theme, Dark Theme and Custom Theme)
Localization System
New Web2 package
Updated :
Removed "AddFreeAnimation" method from Account class. Refer to "Import Free Emotes" section in documentation.
Updated UI Initialization directly through the class KinetixUIEmoteWheelConfiguration in the KinetixUI initialization. Refer to "UI Integration" section in documentation.
Update From 0.3.0 :
If you were using "AddFreeAnimation" method, you can import animations locally now through our custom editor to import them locally.
If you were using the ScriptableObject ConfigurationUI, you can transfer your initialisation informations in parameter of KinetixUI.Initialize method.
_____________________________________________________
Added :
MaxPersistentDataStorageInMB added in KinetixCoreConfiguration
MaxRamCacheInMB added in KinetixCoreConfiguration
Updated :
Improved Foot Correction Retargeting
Improved Memory Management
Reduced Emote Loading duration on remote peers
No more specific version of Newtonsoft required
Ik layer is now in open beta, see
FrameController - introducing new features: Pause/Resume, Loop, Go To Time, Adjustable Playrate / Play backward, Trim animation (Play subpart of emote). See
OnRegisteredLocalPlayer
None
Called upon updated informations on account.
OnPlayedAnimationLocalPlayer
AnimationIds
Called upon connected account.
OnPlayedAnimationQueueLocalPlayer
AnimationIds[]
Called upon animation queue is played from local player
OnAnimationStartOnLocalPlayerAnimator
AnimationIds
Called upon animation starts on animator
OnAnimationEndOnLocalPlayerAnimator
AnimationIds
Called upon animation ends on animator
RegisterLocalPlayerAnimator(
Animator _Animator
)
void
Register Local Player Animator
RegisterLocalPlayerAnimator(
Animator _Animator,
RootMotionConfig _Config
)
void
Register Local Player Animator with a Root Motion configuration
RegisterLocalPlayerCustom(
DataBoneTransform _Root,
Transform _RootTransform,
IPoseInterpreter _PoseInterpreter
)
void
Advanced registration of Local Player for custom behaviour
RegisterLocalPlayerCustom(
DataBoneTransform _Root,
Transform _RootTransform,
IPoseInterpreter _PoseInterpreter,
RootMotionConfig _Config
)
void
Advanced registration of Local Player for custom behaviour with a Root Motion configuration
RegisterLocalPlayerCustom(
Avatar _Avatar,
Transform _RootTransform,
ExportType _ExportType
)
void
Advanced registration of Local player with an Avatar Component.
RegisterAvatarAnimator(
Animator _Animator
)
string
Register an avatar for non local player [Returns : ID of the avatar]
RegisterAvatarAnimator(
Animator _Animator,
RootMotionConfig _Config
)
string
Register an avatar for non local player with Root Motion configuration [Returns : ID of the avatar]
RegisterAvatarCustom(
DataBoneTransform _Root,
Transform _RootTransform,
IPoseInterpreter _PoseInterpreter
)
string
Advanced registration of non Local Player for custom behaviour [Returns : ID of the avatar]
RegisterAvatarCustom(
DataBoneTransform _Root,
Transform _RootTransform,
IPoseInterpreter _PoseInterpreter,
RootMotionConfig _Config
)
string
Advanced registration of non Local Player for custom behaviour with a Root Motion configuration [Returns : ID of the avatar]
RegisterAvatarCustom(
Avatar _Avatar,
Transform _RootTransform,
ExportType _ExportType
)
string
Advanced registration of non Local Player with an Avatar Component. [Returns : ID of the avatar]
UnregisterLocalPlayer()
void
Unregister the Local Player
UnregisterAvatar(string _PlayerUUID)
void
Unregister a given NPC / Avatar
PlayAnimationOnLocalPlayer(
AnimationIds _AnimationIds
)
void
Play animation on Local Player
PlayAnimationOnLocalPlayer(
string _EmoteID
)
void
Play animation on Local Player
PlayAnimationOnAvatar( string _PlayerUUID,
AnimationIds _AnimationIds
)
void
Play animation on Avatar
PlayAnimationOnAvatar( string _PlayerUUID,
string _EmoteID
)
void
Play animation on Avatar
PlayAnimationQueueOnLocalPlayer(
AnimationIds[] _AnimationIds,
bool _Loop
)
void
Play animation queue on Local Player
PlayAnimationQueueOnLocalPlayer(
string[] _EmoteIDs,
bool _Loop
)
void
Play animation queue on Local Player
GetRetargetedKinetixClipFor
LocalPlayer(
AnimationIds _AnimationIds,
Action<KinetixClip> _OnSuccess,
Action _OnFailure
)
void
Get Retargeted KinetixClip for local player
GetRetargetedKinetixClipFor
LocalPlayer(
string _EmoteID,
Action<KinetixClip> _OnSuccess,
Action _OnFailure
)
void
Get Retargeted KinetixClip for local player
GetRetargetedAnimationClip
LegacyForLocalPlayer(
AnimationIds _AnimationIds,
Action<AnimationClip> _OnSuccess,
Action _OnFailure
)
void
Get Retargeted AnimationClip Legacy for local player
GetRetargetedAnimationClip
LegacyForLocalPlayer(
string _EmoteID,
Action<AnimationClip> _OnSuccess,
Action _OnFailure
)
void
Get Retargeted AnimationClip Legacy for local player
StopAnimationOnLocalPlayer()
void
Stop animation on local player
LoadLocalPlayerAnimation(
AnimationIds _AnimationIds, string _LockID,
Action _OnSuccess
)
void
Load a local player animation
LoadLocalPlayerAnimation(
string _EmoteID, string _LockID,
Action _OnSuccess
)
void
Load a local player animation
LoadLocalPlayerAnimations(
AnimationIds[] _AnimationIds, string _LockID,
Action _OnSuccess
)
void
Load local player animations
LoadLocalPlayerAnimations(
string[] _EmoteIDs, string _LockID,
Action _OnSuccess
)
void
Load local player animations
LoadAvatarAnimation( string _PlayerUUID
AnimationIds _AnimationIds, string _LockID,
Action _OnSuccess
)
void
Load an avatar animation
LoadAvatarAnimation( string _PlayerUUID
string _EmoteID, string _LockID,
Action _OnSuccess
)
void
Load an avatar animation
LoadAvatarAnimations( string _PlayerUUID
AnimationIds[] _AnimationIds, string _LockID,
Action _OnSuccess
)
void
Load avatar animations
LoadAvatarAnimations( string _PlayerUUID
string[] _EmoteIDs, string _LockID,
Action _OnSuccess
)
void
Load avatar animations
UnloadLocalPlayerAnimation(
AnimationIds _AnimationIds, string _LockID,
)
void
Unload a local player animation
UnloadLocalPlayerAnimation(
string _EmoteID, string _LockID,
)
void
Unload a local player animation
UnloadLocalPlayerAnimations(
AnimationIds[] _AnimationIds, string _LockID,
Action _OnSuccess
)
void
Unload local player animations
UnloadLocalPlayerAnimations(
string[] _EmoteID, string _LockID,
Action _OnSuccess
)
void
Unload local player animations
UnloadAvatarAnimations( string _PlayerUUID
AnimationIds[] _AnimationIds, string _LockID,
Action _OnSuccess
)
void
Unload avatar animations
UnloadAvatarAnimations( string _PlayerUUID
string[] _EmoteIDs, string _LockID,
Action _OnSuccess
)
void
Unload avatar animations
IsAnimationAvailable
OnLocalPlayer(
AnimationIds _AnimationIds
)
bool
Check if animation ready to be play on Local Player [Returns : True if loaded]
IsAnimationAvailable
OnLocalPlayer(
string _EmoteID
)
bool
Check if animation ready to be play on Local Player [Returns : True if loaded]
GetNotifiedOnAnimationReady
OnLocalPlayer(
AnimationIds _AnimationIds,
Action _OnSuccess
)
void
Get notified when an animation is ready on local player
GetNotifiedOnAnimationReady
OnLocalPlayer(
string _EmoteID,
Action _OnSuccess
)
void
Get notified when an animation is ready on local player
GetLocalKCC()
Kinetix
Character
ComponentLocal
Get the Local Kinetix Character Component [Returns : Local Kinetix Character Component]
GetPlayerList()
List<string>
Get a Ids list of all registered avatars [Returns : Ids list of registered avatars]
IsLocalPlayedRegistered()
bool
Check if local player is registered [Returns : true if local played is registered]
SetConfiguration(
KinetixNetworkConfiguration _Configuration
)
void
Set the Kinetix Network Configuration
GetConfiguration()
Kinetix Network Configuration
Get the Kinetix Network Configuration
GetRemoteKCC(
string _RemotePeerUUID
)
Kinetix Character Component Remote
Get the Kinetix Character Component Remote based on the remote peer UUID
RegisterRemotePeerAnimator(
string _RemotePeerUUID,
Animator _Animator
)
void
Register remote peer animator based on remote peer UUID
RegisterRemotePeerCustom(
string _RemotePeerUUID,
DataBoneTransform _Root, Transform _RootTransform,
IPoseInterpreter _PoseInterpreter
)
void
Advanced register of remote peer avatar based on remote peer UUID
UnregisterRemotePeer(
string _RemotePeerUUID
)
void
Unregister remote peer based on peer UUID
UnregisterAllRemotePeers()
void
Unregister all the remote peers
GetAnimationMetadataByAnimationIds(
AnimationIds _AnimationIds,
Action<AnimationMetadata> _OnSuccess,
Action _OnFailure
)
void
Get metadata of a specific animation
GetAnimationMetadataByAnimationIds(
string _EmoteID,
Action<AnimationMetadata> _OnSuccess,
Action _OnFailure
)
void
Get metadata of a specific animation
IsAnimationOwnedByUser(
AnimationIds _AnimationIds,
Action<bool> _OnSuccess,
Action _OnFailure
)
void
Check if animation is owned by connected user
IsAnimationOwnedByUser(
string _EmoteID,
Action<bool> _OnSuccess,
Action _OnFailure
)
void
Check if animation is owned by connected user
GetUserAnimationMetadatas(
Action<AnimationMetadata[]> _OnSuccess,
Action _OnFailure
)
void
Get metadatas of connected user's animations
GetUserAnimationMetadatasByPage(
int _Count,
int _PageNumber,
Action<AnimationMetadata[]> _OnSuccess,
Action _OnFailure
)
void
Get metadatas of connected user's animations by pagination
GetUserAnimationMetadatas
TotalPagesCount(
int _CountByPage,
Action<int> _OnSuccess,
Action _OnFailure
)
void
Get total pages of user's animation based on _CountByPage
LoadIconByAnimationId(
AnimationIds _AnimationIds
Action<Sprite> _OnSuccess,
CancellationTokenSource token
)
void
Load an icon into a sprite based on AnimationIds
LoadIconByAnimationId(
string _EmoteID
Action<Sprite> _OnSuccess,
CancellationTokenSource token
)
void
Load an icon into a sprite based on EmoteID
UnloadIconByAnimationId(
AnimationIds _AnimationIds
Action _OnSuccess,
Action _OnFailure
)
void
Unload an icon
UnloadIconByAnimationId(
string _EmoteID
Action _OnSuccess,
Action _OnFailure
)
void
Unload an icon
Quickly integrate Kinetix's SDK on Unreal.
Follow this tutorial to use the Third Person Template to illustrate an integration.
Follow these steps to have a default Third Person Template project:
Launch Unreal Engine (5.2 here)
The Unreal Project Browser opens. Select the "Games" section, then select "Third Person", configure it to be Blueprint and name it (we will call it here "KinetixIntegration")
Get your Game authentification API Key from Kinetix's Developer Portal to link your game with Kinetix technologies.
There are 2 types of Keys:
Limited - Free key used for tests and pre-production purposes. You won't be charged anything using that key in a pre-prod environment. Note that with a Limited key, the number of User-Generated Emote you can create is limited, to avoid issues.
To request an authentification Game API Key on the Developer Portal, you need to have a game space created. If you do not already have a game space created, head to your dashboard, and create your game space by clicking on "Create a game".
Then, click on the "Get API key" button, below "Activate your Game/App API Key.
Copy and save your Game API Key. You will have to use it soon!
CAUTION: your Game API Key will be displayed only once. It is crucial that you copy and save it before closing the pop-up, otherwise you will have to restart the process!
Initialize the Kinetix Unreal SDK
The initialization of the Kinetix SDK should only be done ONCE when the app starts.
You can initialize the SDK with parameters in the KinetixCoreConfiguration available in Edit -> Project Settings -> Game -> Kinetix Settings.
EnableAnalytics => true if you want to help us improve our SDK by sharing usage data.
ShowLogs => true if you want to log the behavior of the SDK for debug purposes.
Cached Emotes => Number of emotes to save on disk for bandwidth saving. Value must be higher than 0 (we recommend 255)
Make sure to set the cached emote setting above 0
You can use this circuit to initialize the SDK, before proceeding to the next steps to connect a user and register a player component. To start mapping, click on Content Drawer > Blueprints > BP_ThirdPerson Character.
In this section, you will learn how to initialize the Kinetix's SDK in your Unreal application with our Core functionalities.
Import the Kinetix Unreal SDK
Open your versioning application and clone the following repository inside a "Plugins" folder (you may have to create it yourself at the root of your project) from :
Add a dot "." at the end of the url to avoid creating a folder with the name of the project and have everything inside the project's "Plugins" folder.
Then clone the glTFRuntime project from the URL below (still within "Plugins" folder):
Then clone the Kinanim Unreal Plugin from the url below
You should have at least these packages in your "Plugins" folder.
Once the project is cloned, open it. It will ask you to build the missing modules. Select "Yes".
To ensure that the plugins are well installed, open the "Content Browser", click on "Settings" then "Show Plugin Content"
Kinetix's SDK uses API keys to authenticate Emote requests. You can view and manage your API key in the .
Register on to generate your Game API Key and start leveraging Kinetix's User-Generated Emote feature.
Unlimited - Free key used for production purposes. Access to the key is free but depending on your usage you might be charged based on our policy. To obtain an Unlimited key, head to your dashboard on the Developer Portal, and click on "Upgrade to Unlimited", in the "Monitoring" section.
Game API Key => Here is the field where you insert the Game API Key you got from .
Before you go further, please ensure that you have installed all the dependencies from
Now that KinetixCore has been imported, you can start the initialization at .
STEP 1 - DOWNLOAD & SETUP THE SDK
STEP 2 - Initialize the Core Package
STEP 3 - INTEGRATE THE USER-GENERATED EMOTE FEATURE


Start from version 0.4 of the SDK, we ask you to uplaod your avatar on the Developer portal
Manage your players' accounts and their emote content directly.
Each time a ConnectAccount method is called, we fetch automatically the user-generated emotes associated with the given userID.
You need to create a unique and immutable _UserId for each one of your user. You can for example use the UserID of the distribution's platform, but it can be any unique chain of character of your choice.
The account module of our SDK only accept one user at the time. Any attempt to log in another user will disconnect the previous one.
Please note that the number of emote fetched for a single user is currently limited to 1000 emotes
How to use the new Local player system in Unreal
The SDK utilizes our advanced online retargeting system to enhance the quality of your emotes by generating animations directly onto your skeleton. This removes the need for runtime retargeting.
Upload Model:
Navigate to the "Avatar Set up" tab.
Upload your model as a .fbx file.
Map the Bones:
Map the bones of your avatar. For detailed guidance, follow the instructions provided on Avatar Upload.
Animations generated BEFORE adding your avatar will not work with your newly added avatar.
Display Avatar ID:
Once your setup is complete, click on "Display ID" and copy it for use in Unreal Engine.
Your setup is done. Click on "Display ID" and copy it.
Now let's get back to Unreal.
Make sure you initialized the KinetixCore as shown in UE SDK Core Package Initialization
Configure your pawn as usual.
Register your AnimInstance and paste the copied Avatar ID into the Avatar UUID's field.
Make sure you configured an AnimBlueprint on your SkeletalMesh.
Retrieve the metadata of an animation ID using GetAnimationMetadataByAnimationID.
Before loading an animation, fill the skeleton that will be used to decompress the animation.
Use the received metadata to load the animation. The avatar ID should be the one you have in your clipboard.
And then, simply play the animation on your avatar!
How to use the new Avatar system in Unreal
In addition to a local player, you can register "Avatars" to play emotes on your NPCs for example.
If you already registered the rig in the previous steps, you can go directly to "The code"
Add and setup your avatar to correctly.
Animations generated BEFORE adding your avatar will not work with your newly added avatar.
After your avatar is successfully processed you can create new emotes and play them directly to your character in engine.
Your setup is done. Click on "Display ID" and copy it.
Now let's get back to Unreal.
Make sure you initialized the KinetixCore as shown in UE SDK Core Package Initialization
You can configure your pawn like any other. The only required setup now is to register your AnimInstance.
And inside Avatar UUID's field just paste the avatar ID you have in your clipboard.
Make sure you configured an AnimBlueprint on your SkeletalMesh
After that get back the metadatas of an animation ID with GetAnimationMetadataByAnimationID
Before loading an animation, we have to fill the skeleton that will be used to decompress the animation.
After that, you can use the received metadatas to laod the animation
The avatar ID is still the one in your paperclip
And after that just play the animation on your avatar
Blendhsape support is enabled by default but if you to toggle it you can go to:
Project Settings -> Game -> Kinetix Settings and toggle off the checkbox "Enable Morph Targets"
Now that everything is setup, we will launch an animation by the end of this page
The initialization of the Kinetix SDK should only be done ONCE when the app starts.
You can initialize the SDK with parameters in the KinetixCoreConfiguration available in Edit -> Project Settings -> Game -> Kinetix Settings.
EnableAnalytics => true if you want to help us improve our SDK by sharing usage data.
ShowLogs => true if you want to log the behaviour of the SDK for debug purposes.
Cached Emotes => Number of emotes to save on disk for bandwidth saving. Value must be higher than 0 (we recommend 255)
Make sure to set the cached emote setting above 0
We will create a separate world to avoid interfering with your work. For that, go at the top of the window and select "File" and then "New Level"
Select the "Basic" level as we don't need to warm up our room with an open world with World Partition and click "Create"
Save our newly created map by using Ctrl + S command.
It will ask for the destination of your map. Click on "Content" folder and create a new folder inside it called "Maps" by:
Left click on "Content" and use Ctrl + N command
Name that folder "Maps"
We will get rid of the unnecessary actors of the basic template. For that, go to the "Outliner"
Select "ExponentialHeightFog", "SkyAtmosphere", "SkyLight", "SM_SkySphere" and "VolumetricCloud" by clicking "ExponentialHeightFog" and while holding Shift, click on "Volumetric Cloud":
Now delete them by either:
Pressing "Delete" on the keyboard
Right click on any of the selected actors, select "Edit" and then "Delete"
Save the level by using:
Ctrl + S command
At the top of the window, select "File" and then "Save Current Level"
Our world is practically all setup to welcom our pawn. Let's create it.
To setup the Pawn correctly, we will first need a valid mesh.
Make sure to follow the Avatar Upload, and setup your mesh to be adle to get an Avatar ID as we will need it in the final part.
To import a new mesh, we will first create a repertory for it. So open the "Content Browser" by:
Using Ctrl + Spacebar command
Or directly use Ctrl + N
Create a second folder called "Characters", and another with any name you want. We will call it "MyCharacter". This one will hold all the assets like Skeletal Meshes, Skeleton, Materials...Etc
Go into that folder and import your skeletal mesh by:
Dropping your file from Windows explorer directly inside Unreal
A window appears to setup the importation of the mesh. Go into "Mesh" section, deploy "Advanced" and put "Import Morph Targets" to true
We will rename the skeletal mesh as "SKM_MyCharacter". The other ones we will not use them. To do that, select your skeletal mesh (the pink one) and either:
Right click on it and select "Rename"
Or use F2 command on your keyboard
In order to play our animations, we need to create an Anim Blueprint. So to do that, right click on your Skeletal Mesh, go to "Create" under "Skeletal Mesh" section and select "Anim Blueprint"
Name it "ABP_MyCharacter" and open the newly created asset.
Reparent your Anim Blueprint to "KinetixAnimInstance" type by:
At the top of your window, select "File" and "Reparent Blueprint"
Once it's done, open the "Event Graph" of the Anim Blueprint by:
Clicking on "Event Graph" inside the "My Blueprint" panel located under "GRAPHS" section
Add the necessary nodes "Send Networked Pose" and "Set Network Modes" inside the blueprint by:
The first one by double clicking on "Send Networked Mode" inside "My Blueprint" under "Interfaces" section, "Kinetix" then "Networking" and finally "Send Networked Pose"
The second one by right clicking inside the "Event Graph" and typing "Send Networked Pose" and selecting the first one on the list
The last one by right clicking inside the "Event Graph" and typing "Set Network Mode"
It should look like that:
Once the three events are implemented, compile the blueprint by:
Or use F7 command.
The SDK add a blending between the start and the end of the animation. To be able to display it, double click on the "AnimGraph" located under the "Animation Graph" of "My Blueprint" tab
Once in the Anim Graph, drag and drop from the "Output Pose" and start typing "Slot Default"
Select "Slot 'DefaultSlot'"
It should be bound automatically to the "Output Pose" node of the Anim Graph.
Compile, save your blueprint and close it by clicking the cross at the right of the "ABP_MyCharacter" major tab.
Now let's assemble averything made previously by creating the blueprint that will hold our skeletal mesh and anim blueprint.
Go back to the "MainMap" major tab.
Open the "Content Browser", and under the "Content" folder, create a folder called "Blueprints". Select this folder.
Create a blueprint by:
Right clicking on the "Blueprints" folder and under "Add/Import Content", select "Blueprint Class"
It will open a new window to select the parent class.
Click on "Pawn"
Name it "BP_MyCharacter", use "Enter" and open the blueprint.
Drag and drop the newly skeletal mesh by left clicking on its icon and while holding the left click, move it to "Default Scene Root" to make it the new root of your Pawn.
If you're using a relative located Skeletal Mesh Component (like the Third Person Template) and you notice an offset when playing our animations. Please make sure that your component's relative location is correctly set. For example. the Third Person Character given with the Third Person Template is slightly above the ground and you have to put its "Z" relative location from -89 to -94.
Now let's configure the skeletal mesh component with the assets we created/imported ago.
Under "Details" panel, in "Animation" section set the "Anim Class" to "ABP_MyCharacter"
Now go to the "Mesh" section and set the "Skeletal Mesh Asset" to your skeletal mesh imported before. For me it will be "SKM_MyCharacter". So click on the combobox and start typing "SKM" and select the right mesh.
Now go back to the "Components" tab and add a "Spring Arm" component. It should automatically be a child of the Skeletal Mesh component.
Inside the "Details" panel, under the "Transform" section, update the "Location" and "Rotation" to put the red wire on the "Viewport" in front of our character. For us it will be this
Now go back to the "Components" panel and add a "Camera" it should be a child of the Spring Arm recently created
Your character should look like this
Compile, save and close BP_MyCharacter major tab
Now that everything is configured. The last step is to setup a game mode in such way that it will spawn our BP_MyCharacter when we play our level.
To do that open the "Content Browser" and inside "Blueprints" folder. Create a blueprint of type "game mode base" by:
In the new window, select the folder "Blueprints", name it "GM_MyGameMode" and click "Save"
It automatically opens
Or create a blueprint like any else, select "GameModeBase" as parent class. And save it into the "Blueprints" folder.
Name it "GM_MyGameMode" and open it.
Inside GM_MyGameMode, under "Classes" section, set "Default Pawn Class" as a "BP_MyCharacter" pawn by clicking on the combobox, typing "MyCharacter" and selecting "BP_MyCharacter"
Done ! Now let's make a UI that will let you create and play an animation.
Go inside the "Blueprints" folder and create a new widget blueprint by creating a blueprint but instead of selecting a default blueprint. We will go under "User Interface" section and select "Widget Blueprint"
We will then select the default "User Widget" as our parent class and name it "WBP_MyWidget". Open the widget.
We will do a basic setup of 2 buttons to send the default browser of your OS to launch our portal and play when the animation is ready your animation.
For that we will first add an Overlay by going in the "Palette" tab, search for "Overlay".
Then add it to the hierarchy by drag and dropping one inside the "Hierarchy" panel, then on top of "[WBP_MyWidget]" entry.
Add a "Horizontal Box" as a children of the newly added overlay by doing the same operation.
Click on "Horizontal Box".
Inside the "Details" panel, under "Slot (Overlay Slot)" section. Set its "Horizontal Alignement" to Center Align Horizontally
Add 1 "Button" as a child of the horizontal box
Add 1 "Spacer" as a child of the horizontal box
Add 1 "Button" as a child of the horizontal box
Add a "Text" as a child of the first and the second button
Click on the "Text" of the first button. And inside the "Details" panel, under "Content" section, set its "Text" field to "CREATE"
Repeat the operation for the second button, except that the "Text" field will be "PLAY" and not "CREATE"
Click on "Spacer" inside "Hierarchy" panel. Inside "Details" panel, under "Appearance" section, set its size to 128.
Click on the first button and inside "Details" panel. Name the button "BT_Create" and set the "Is Variable" checkbox to true
You're sent to the "Graph Editing Mode" where you can see that the event is created
Go back to the "Blueprint Designer Mode" by clicking the "Designer" button on top right of your window.
Now that you're back. Repeat the operation for the second button, but instead of calling it "BT_Create", you're going to call it "BT_Play"
It should look like this
Now that everything is setup, let's add the code necessary to create and play animations.
Add a node "Set Is Enabled" by right clicking in the graph and typing "SetIsEnabled" and selecting the function under the "Widget" section, not the variable !
Let the "In Is Enabled" to false and connect it to the "On Initialized" event node.
Now add a "KinetixCoreSubsystem" node to the graph the same way
Drag and drop from the subsystem node and type "UGC" and click on "Get Kinetix UGC"
Now the same way, drag and drop from the "Kinetix UGC" node and enter "Get UGCUrl". Add it to the graph.
Connect the node to "Set Is Enabled"
Drag and drop from "Url Fetched Callback", once you release the left click, a window open and extend the "Add Event" to select "Add Custom Event...", name it "OnUGCUrlFetched"
Add a new node "Clear Smart Cache" and connect it to "Get UGCUrl" node.
Right click on the pink output called "Url" of the newly created event "OnUGCUrlFetched" and click on "Promote to Variable"
The node is automatically connected and the variable is created
Add a "Set Is Enabled" node, set its "In Is Enabled" input to true and connect it to the "SET" of "Url" value.
It should looks like this
Now get a "Kinetix Core Subsystem", drag and drop a "Kinetix UGC" and from it, call "Get UGC Url" again.
Connect the execution pin to the "On Pressed" of the "BT_Create" node
Now drag and drop from the red square, add a "Custom Event" and call it "OnURLFetchedAndLaunch"
Drag and drop the "UgcUrl" from the "My Blueprint" tab under "Variables" section and put it on the "Url" output pin. It creates automatically the "SET" node for the "UgcUrl" variable
Now add a "Launch URL" node and connect the output of the "SET" node to the "URL" input
Get the KinetixCoreSubsystem, drag and drop from it and type "Metadata" and select "GetKinetixMetadata"
From the metadata, drag and drop and ask for "Get User Animation Metadatas"
Connect the node to "On Pressed" event of "BT_Play"
Add a custom event from the callback of "Get User Animation Metadatas" called "OnMetadatasAvailable" and make a variable of the output "Metadatas"
from the "SET" node ask for its "Length" and ask if its greater than 0
Branch the result
Get the Metadatas variable and also get its first occurence, ask to break it, and from the "Id" output, right click and promote it to a variable. Call that variable "EmoteToPlay". Connect the "SET" node to the "True" execution pin of the previous branch.
Now just click anywhere and ask for "Get Owning Player", drag and drop the result and call "Get Controlled Pawn", again, drag and drop, and call "Cast to BP_MyPawn". Drag the "As Bp My Pawn" and ask for "Get Skeletal Mesh Asset"
It automatically gets the field "Skeletal Mesh" and call the right node
Now ask for a "KinetixCoreSubsystem", drag and drop and call "Kinetix Animation" drag and drop and call "SetReferenceSkeleton"
Bind the result of "Get Skeletal Mesh Asset" into the input of "Set Reference Skeleton" and bind the execution string from the "Cast to BP_MyPawn" to "Set Reference Skeleton"
Connect the output execution of "SET" to the "Cast"
Get the Kinetix Metadata from the "KinetixCoreSubsystem" and ask for "Get Animation Metadata byAnimation ID"
Connect its execution pin to the "SetReferenceSkeleton" output execution one
Drag and drop "Emote To Play" from the "Variables" section of the "My Blueprint" tab and connect it to the "In ID" input
Create a custom event from the "Callback of "Get Animation Metadata by AnimationID"
Call it "OnMetadataAvailable"
Get the "Kinetix Animation" from a "KinetixCoreSubsystem" and ask for "Set Curve Remapper"
Drag and drop from the "In Remapper" input, type "Create Event" and add it to the graph
Click on the combobox and click on "Create a matching function"
Rename the created function "RemapCurve"
From the "Curve Name" input, drag and drop and ask for "Replace" node.
As the "From" input field, enter "mixamorig:" and connect the "Return Value" of the "Replace" to the "Return Value" of the "Return Value" node
Now close the "Remap Curve" tab and go back to the event graph
Get the "Kinetix Animation" from a "KinetixSubsystemCore" and ask for "Load Local Player Animation" node.
As "AnimationID" input, connect to "Emote To Play"
Promote to variable the input "Avatar UUID", click on it, and inside "Details" panel, check "Instance Editable" and "Expose on Spawn" to true.
It should looks like this
Make an event from the "On Success Callback" input called "OnAnimationAvailable"
Get the "Kinetix Animation" from a "Kinetix Core Subsystem" and ask for a "Play Animation on Avatar"
Promote to variable the "In Player GUID" and like the "Avatar UUID" set it "Instance Editable" and "Expose on Spawn"
Connect the "In Animation ID" to a "Emote To Play"
It should look like this
The UI is done. Compile, save and close the major tab.
Now that everything is set, we only have to connect the UI and its code to our "BP_MyCharacter"
For that, open the "Content Browser", go inside the "Blueprints" folder and open BP_MyCharacter"
Click on the "Event Graph" tab, or if you don't see it, double click on "Event Graph" from the "My Blueprint" panel.
Get the "KinetixCoreSubsystem" and ask for the "Register or Call on Initialized" and connect it to the greyed "Begin Play" event node
From a "KinetixCoreSubsystem", ask for "Initialize" node, drag and drop from the "In Configuration", then, under "Kinetix" and "Settings", select "Get Core Configuration"
It should look like this
Now from the "Register or Call on Initialized", create a custom event of it called "OnCoreInitialized"
From a "KinetixCoreSubsystem", get "Kinetix Account" and from it, enter "Assign" and select "Assign On Connected Account"
It creates automatically the event for you. Rename it "OnConnectedAccountEvent"
From a "KinetixCoreSubsystem", get "Kinetix Account" and from it, enter "Connect" and select "Connect Account"
Get a "Kinetix Animation" from a "KinetixCoreSubsystem" and call "Register Avatar Anim Instance"
Go into "Components" panel and drag and drop the component "Skeletal Mesh" into the graph
From that skeletal mesh component ask for a "Get Anim Instance" node and bind it to the "In Anim Instance" of the "Register Avatar Anim Instance" node.
In the "Avatar UUID" input, go to your Dev Portal to copy the Avatar UUID of the skeletal mesh you imported before in "Pawn setup"
And paste it inside the field "Avatar UUID" of the "Register Avatar Anim Instance"
It should look like this:
The Avatar ID you see here is one we generated for our own world following the guide on top of it. Don't use this one !
Promote as Variable the output of "Register Avatar Anim Instance"
Create a function by going to "My Blueprint" and under "Functions" section, click on the "+" sign.
You're directly moved inside that function graph
Call that function "SetupUI"
Right click and ask for "Create Widget"
Connect the execution pins between "Create Widget" and "Setup UI"
As a "Class", set our previously created "WBP_MyWidget"
Right click and ask for "Get Player Controller"
Connect it to the "Owning Player" input of the "Create Widget"
From the "Create Widget" drag and drop the input "Player GUID" and just place it on the "SetupUI"
It automatically creates the Input on "Setup UI" function
Repeat the operation for "Avatar UUID" input
It should look like this
Promote to variable the output of the "Create Widget" and call it "MyUI"
And from the output of the "SET" node, drag, drop and call "Add To Viewport"
Right click and call "Get Player Controller", from it ask for "Set Input Mode Game And UI"
Connect it to the "Add to Viewport" node
From the "My Blueprints" panel, go to 'Variables", and drag and drop "MyUI" and select "Get My UI"
Connect it to the "In Widget to Focus"
Uncheck the "Hide Cursor During Capture"
Copy and paste the node "Get Player Controller" and ask for "Set Show Mouse Cursor".
Set it to true and connect the output execution pin of "Set Input Mode Game And UI" to the "SET"
It should look like this
Close the "Setup UI" tab
Go back to the event graph
Right click and ask for "Setup UI"
Bind the output execution pin of "Set Reference Skeleton" to the input of "Setup UI"
From "My Blueprint", under "Variables" section, drag and drop "Out Guid" (the variable we created as the output of "Register Avatar Anim Instance" node) and bind it as the input for "Player GUID" of "Setup UI"
And finally, paste from the Dev Portal the Avatar ID as the input "Avatar ID" of "Setup UI"
Compile, Save and click Play !
Click "CREATE" to launch the browser and be guided through the process of generating the animation. And once the process is done click Play and see your pawn move !
If you want to stop the animation before its end. Open your pawn's blueprint and ask for any key event by right clicking and type, for example "t key" and search for its key event
Once your event is created drag and drop the Skeletal Mesh Component out of the Components tab.
Drag and drop from your newly created mesh node and type "get anim instance" and select "Get Anim Instance"
From the "Get Anim Instance" node drag and drop, and ask for "Stop Slot Animation"
Put "DefaultSlot" as the "Slot Node Name" input and connect the "Pressed" execution pin from the "T" event to the execution input of "Stop Slot Input"
Open the Kinetix Package Manager and click on "Check For Updates" button.
If an update is available the button will change, you will be able to click on "Update Package Manager" button. This process will just update the manifest and not update the modules.
After the update process is finished, the "Up To Date" label will be back to notify you the package is up to date and the Kinetix Package Manager has successfully updated the packages.
Integrate the Network System
The Networking is completely handled by the Unreal Online Subsystem. However (if using the deprecated parameter bSendPose that allows for a sending of the poses over the network), we want to be able to receive and apply an animation coming from a proxy.
Add a AnimSequenceSamplerComponent.
Make sure that your actor, KinetixCharacterComponent and AnimSequenceSamplerComponent are scheduled for replication:
In this section, learn how to integrate our Emotes with an Animation System in your existing project.
Starting from 0.4, the process has been greatly reduced and now removed the use of the retargeter that can leads to CPU overwhelming.
The only thing you need now is the KinetixCharacterComponent.
The SDK relies on Epic's IK Retargeter inside UE5 to play animation on every skeleton.
If you already have a valid Skeletal Mesh, you have to create an IK Rig for them.
As an exemple for Manny, the UE5's mannequin, We had setup the IK Rig like this:
And then the IK Retargeter is configured like this:
Just keep a place in your AnimInstance to get the retargeted Emotes animations.
The KinetixCharacterComponent is looking for a KinetixAnimationInterface that will notify the AnimBlueprint that the user is trying to play an emote.
The KinetixAnimationInterface also add a function to let know the AnimSequenceSampler if your currently playing an animation. That function created automatically when the interface is added to your AnimBlueprint is:
This circuit will allow your character to be registered:
You may have to adjust the lower part in order to pass the correct SkeletalMeshComponent. You can for example use a variable or the node GetComponent.
We consider this example to occur in a UActorComponent.
The standard BP_ThirdPersonCharacter is not ready to play user-generated emotes yet. To do so, we will need to modify its Blueprint and its AnimBlueprint.
Open the BP_ThirdPersonCharacter
Inside the new opened window, add a SkeletalMesh and call it "SkeletalMeshTarget".
Attach it to the inherited "Mesh (CharacterMesh0)"
Due to the fact that "Mesh (CharacterMesh0)" is inherited from Character class, we need to copy its values (except the transform ones) into the newly added "SkeletalMeshTarget"
Replace the values of "Mesh (CharacterMesh0)" with
Add a "KinetixCharacterComponent" and a "AnimSequenceSamplerComponent" to the ThirdPersonTemplate in Components > Add.
Open the Animation Blueprint "ABP_Manny" in Content Drawer > Animations.
Click on "Class Settings"
Inside the "Interfaces" section. Add the "KinetixAnimationInterface" to it.
With this interface comes 1 function and 1 event, implement them by double clicking on each one.
Keep the result of the event "SetKinetixAnimationPlaying" in a variable:
In "IsKinetixAnimationPlaying", return the "PlayingEmote" variable:
In the "AnimGraph", add a CachePose (we called it here "GameplayPose") after the ControlRig Anim Node:
Add a "Blend Poses By bool" node, connect the "PlayingEmote" boolean value to its "Active Value". Add a "Retarget Pose From Mesh" node, connect it to its "True Pose". Add a "Use cached pose "GameplayPose" node and connect it to its "False Pose". Finally, connect the output of the "Blend Poses by bool" to the global "Output Pose" node:
Click on the "Retarget Pose From Mesh" node and set the "IK_Retargeter Asset" value to "RTG_SamRokoko_To_Manny":
Finally, you can now use this circuit to register your local pawn as the local player avatar:
The BP_ThirdPersonCharacter is ready to play Kinetix Emotes!
Reference for the Kinetix Core SDK.
When a player connects with their username, you can use this circuit to connect their KinetixAccount:
Please note that the ConnectAccount process is async and uses a callback system.
To disconnect a player:
Then (once the user is connected) you can retrieve a user's Emotes metadatas using this circuit.
Please note that similarly to the ConnectAccount process, the metadata fetching is async and uses a callback system.
Each time an user logs in with their email or username in your game, call:
And each time an user logs out:
You can also retrieve manually the user's emotes through the API of the Core via this method :
Go to .
Check that your Unreal Engine version is supported .
needs to be installed to clone the sample project.
Go on and upload your model as a .fbx file.
Starting with 0.7, we added the support of Morph Targets (aka Blendshapes). It's based on the ARKit's implementation (also used in LiveLink) you can find the dictionnary here :
Game API Key => Here is the field where you insert the Game API Key you got from .
Right click on "Content" and select "New Folder"
Name the "MainMap" and click "Save"
If you don't see your "Outliner". At the top of the window, click "Window" -> "Outliner" -> "Outliner 1"
At the bottom of the window, click on
If you don't see your "Content Browser". At the top of the window, select "Window" -> "Content Browser" -> "Content Browser 1"
Click on , then add a new folder called "Blueprints" by:
Right clicking on the folder and select
Click on and the select
Clicking on the left corner of the "ContentBrowser"
Richt click and selecting "Import to..."
Then click on "Import All" and normally you should see your Skeletal Mesh , your Physical Asset , your Skeleton and a bunch of materials.
Click on and inside the "Details" panel (if you didn't have it it should automatically open). Under "Class Options" change the "Parent Class" from "Anim Instance" to "KinetixAnimInstance"
Clicking on the "Event Graph" tab on top of the window
If you don't see the "My Blueprint" panel. On top of the window, click "Window" -> "My Blueprint"
The icon under "Interfaces" -> "Kinetix" -> "Networking" and "Send Networked Pose" should turn Yellow to confirm that it has been implemented
Clicking on the preview's "Compile" button
Clicking on "Compile" at the top of the window
Click on then select "Blueprint Class"
Right Click inside the folder and select "Blueprint Class"
Once inside the blueprint. Under "Components" panel, click on and type "skeletal mesh" and select "Skeletal Mesh"
If you don't see your "Details" panel. At the top of the window, click on "Window" -> "Details"
Going under the blueprint menu marked by symbol, under "World Override" section and "GameMode" entry, go to "Create", select "GameModeBase"
Be ware that this method does not directly set the game mode for your level. To do that, go under your level major tab and inside "World Settings" panel, under "Game Mode" section, set the "Game Mode Override" field to your newly created game mode
If you don't see the "Palette" tab. Go at the top of your window and into "Window" -> "Palette"
Same, if you don't see your "Hierarchy" panel, on top of the window. Go to "Window" -> "Hierarchy"
Under the "Appearance" section, click on the field on the right of "Color and Opacity". A window opens. Click on the pipette and click on the background of the "Color Picker" window. Then click "OK"
Then go down the "Details" panel by using your mouse wheel, once you have reached the "Events" section, click on the Plus sign of the "On Pressed" event
First add the event "OnInitialized". To do that, click on the button inside "My Blueprint" panel, under "Override Function", select "On Initialized"
If you don't see the "Begin Play" node, like the "On Initialized" of the User Widget. Go to "My Blueprint", click on and under "Override Functions", select "Begin Play".
After updating the Kinetix Package Manager, you'll be able to see which modules can also be updated. Click on the "Update Core Bundle" you have previously installed. You can first check the to confirm if the update is minor and seamless or if it requires modifications on your implementation.


This main class is used for SDK initialization.
Setup(
const FKinetixCoreConfiguration&
_Configuration
)
bool
Initialize Kinetix Core SDK
IsInitialized()
bool
Return true if Kinetix Core SDK is initialized
RegisterOrCallOnInitialized(const FKinetixCoreInitializedDelegate& Callback)
void
Bind a delegate to the list to call when the Core is initialized OR call it directly if it is already
Fixed :
Smooth blending
UGC url cached sometimes not actualizing
Improved log handling
Removed double call on metadata being ready
Minor fixes
--------------------------------------------------------------------------------
Added :
Stability improvements in editor and mobile
--------------------------------------------------------------------------------
Added :
Union of 5.4, 5.3 and 5.2 into 1 single branch
Support for kinanim blendshapes (upcoming)
--------------------------------------------------------------------------------
Added :
Support for UE 5.4, UE 5.3
Kinanim streaming: The animation can start playing before the download is finished
--------------------------------------------------------------------------------
Added :
The UE SDK now uses our proprietary format (.kinanim) to optimize animation weight
--------------------------------------------------------------------------------
Added :
Standard and Contact Aware retargeting support for your uploaded avatars
--------------------------------------------------------------------------------
Added :
Support for latest Kinetix rig
Multiavatar (npc) feature
SmartCache for emote download optimization
--------------------------------------------------------------------------------
Added :
Create UGC Emote with Companion in the new Create tab
Updated :
UI fixes and stabilization
OnUpdatedAccount
None
Called upon updated informations on account.
OnConnectedAccount
None
Called upon connected account.
OnDisconnectedAccount
None
Called upon disconnected account.
ConnectAccount(
const FString& InUserId
)
void
Connect account with UserId
DisconnectAccount()
void
Disconnect connected account
GetConnectedAccount(
FName& OutUserName
)
void
Returns the currently connected account (empty if no user connected)
GetAnimationMetadataByAnimationIds(
const FAnimationID& InAnimationID,
const FOnMetadataAvailable& Callback
)
void
Get metadata of a specific animation
IsAnimationOwnedByUser(
const FAnimationID& InAnimationID,
const FOnMetadataOwnershipLoaded& Callback
)
void
Check if animation is owned by connected user
GetUserAnimationMetadatas(
const FOnMetadatasAvailable& Callback
)
void
Get metadatas of connected user's animations
GetUserAnimationMetadatasByPage(
int InCount,
int InPageNumber,
const FOnMetadatasAvailable& Callback
)
void
Get metadatas of connected user's animations by pagination
GetUserAnimationMetadatas
TotalPagesCount(
int InCountByPage,
const FOnTotalNumberOfPagesAvailable& Callback
)
void
Get total pages of user's animation based on _CountByPage
LoadIconByAnimationId(
const FAnimationID& InAnimationID,
const FOnIconAvailable& OnIconAvailable
)
void
Load an icon into a sprite based on AnimationIds
OnRegisteredLocalPlayer
None
Called upon updated informations on account.
OnPlayedKinetixAnimationLocalPlayer
const FAnimationID&
Called upon animation being played from local player.
OnPlayedAnimationQueueLocalPlayer
const TArray<FAnimationID>&
Called upon animation queue is played from local player
OnAnimationStartOnLocalPlayerAnimator
const FAnimationID&
Called upon animation starts on animator
OnAnimationEndOnLocalPlayerAnimator
const FAnimationID&
Called upon animation ends on animator
RegisterLocalPlayerAnimator(
Animator _Animator
)
void
Register Local Player Animator
RegisterLocalPlayerAnimInstance(
UAnimInstance* InAnimInstance
)
void
Register Local Player AnimInstance
UnregisterLocalPlayer()
void
Unregister the Local Player
PlayAnimationOnLocalPlayer(
const FAnimationID& InAnimationID
)
void
Play animation on Local Player
PlayAnimationQueueOnLocalPlayer(
const TArray<FAnimationID>& InAnimationIDS,
bool _Loop
)
void
Play animation queue on Local Player
StopAnimationOnLocalPlayer()
void
Stop animation on local player
LoadLocalPlayerAnimation(
const FAnimationID& InAnimationId, FString& InLockID,
const FOnKinetixLocalAnimationLoadingFinished& OnSuccessDelegate
)
void
Load a local player animation
LoadLocalPlayerAnimations(
TArray<FAnimationID>& InAnimationIDs, FString& InLockID,
Action _OnSuccess
)
void
Load local player animations
UnloadLocalPlayerAnimation(
TArray<FAnimationID>& InAnimationID, FString& InLockID,
const FOnKinetixLocalAnimationLoadingFinished& OnSuccessDelegate
)
void
Unload a local player animation
UnloadLocalPlayerAnimations(
TArray<FAnimationID>& InAnimationIDs, FString& InLockID,
Action _OnSuccess
)
void
Unload local player animations
GetLocalKCC()
UKinetixCharacterComponent*
Get the Local Kinetix Character Component [Returns : Local Kinetix Character Component]
Link a webhook to get updates on your processes
It is recommended to subscribe to Webhook events instead of polling APIs. To do so, enable webhooks and register a URL that will receive a POST request whenever one of the events below occurs.
This page serves as a guide for those who have a project already setup with the plugin 0.3
Go to the plugins folder and git pull the latest version of the plugin
Add and setup your avatar correctly.
Animations generated BEFORE adding your avatar will not work with your newly added avatar.
After your avatar is successfully processed you can create new emotes and play them directly on your pawn in game.
Your setup is done. Click on "Display ID" and copy it.
Now let's get back to Unreal.
Now the pawn doesn't need 2 skeletal meshes anymore as the animations downloaded are directly retargeted for the given rig server-side.
Remove the SkeletalMeshComponent "SkeletalMeshSource" and just let your own SkeletalMeshComponent.
You can refer to Avatar system in Unreal Engine for more details
On the code, there is a new variable that comes with the Avatar uploading on the dev portal, the AvatarUUID.
After you have register your anim instance with its AvatarID, you can follow the same path to download an animation until you reach LoadLocalPlayerAnimation node:
If nothing shows or you can't play the animation, verify that the status of your avatar on the dev portal is "Available"
And after doing the path to download the animation you can simply call PlayAnimationOnLocalPlayer
A new way of networking that saves a lot of bandwith and resources is to disable the SendPose in Project Settings > Kinetix Settings section.
The purpose of this page is to lead you through the integration of the User-Generated Emote feature using the Kinetix SDK API.
Using Kinetix Core, get the link to the Progressive Web Application (PWA) that will let your players upload or record their video
Make sure you followed the steps of SDK Core Modules activation - Unreal
You must have connected a player in order to get the PWA url (the userid is encoded in the url). Once the process is done, the emote will be directly linked to the user id provided.
You can use this circuit to obtain the link to the Web App.
Once in the web application, gamers can either record or upload a video to create their own Emote.
Once the video uploaded, gamers can trim the portion of video they wish to extract to create their emote
Once the video cropped, gamers can name their Emote, define if it contains Mature Audience or not (any trolling/hateful behaviours) and agree to the Terms & Conditions.
Et voilà !
Once the Emote successfully created, gamers can go back to your game and wait for the Emote to be processed (5 min average waiting time). Once processed, it will appear when fetching the gamer's emotes (see Account Management - UE for more information).
Get your Game authentification API Key from Kinetix's Developer Portal to link your game with Kinetix technologies.
Once you've created your account, click on the "Learn More" button below "Use our API":
And create your Game/App Space :
You can then click on the button "+ Get API key" at the top of your screen and retrieve it. (Make sure to copy and save it somewhere as you won't be able to display it again)
Integrate Kinetix's API and get started with the User-Generated Emote feature!
Welcome to the Kinetix API, a solution designed to integrate the User-Generated Emote feature in any game or app, empowering players to create custom emotes from videos through a seamless and interactive process. This API enables game studios to fully customize the integration of the feature in their game or app.
When using the Kinetix API to bring the User-Generated Emote feature in your game, you need to recreate the main steps of the emote creation flow we've designed.
Before integrating the Kinetix API into your game, establishing a secure method for authenticating and identifying your users is paramount. Our system leverages OAuth 2.0, a robust protocol designed to ensure that user interactions with Kinetix's AI are securely authenticated. Without the authentication step, it is impossible to associate players with generated emotes.
Authentication ensures that emotes generated through the Kinetix AI are uniquely associated with the correct user account, enabling a personalized gaming experience.
Once authenticated, your game will request a token from Kinetix’s API. This token is crucial for initiating the Machine Learning (ML) process that transforms player-submitted videos into custom emotes. It acts as a temporary credential, that allow your game and the Kinetix API to identify and authorize users without directly handling their login credentials. Tokens ensure that each request to the API is authenticated and authorized, enabling a secure and personalized user experience.
With the token generated, the next step is to create a QR code that players can scan. This QR code directs players to a secure upload interface where they can submit their video. This step emphasizes user-friendliness, allowing players to easily contribute content from their devices.
After video submission, your game uses the API to initiate the ML process, sending the video along with the token to Kinetix’s servers. Our advanced AI analyzes the video, crafting a custom animation that captures the player’s intended emote.
Throughout the ML process, your game can query the API to check the status of the emote creation. Once complete, you'll validate the process, making the emote available in-game. This step ensures that the generated content meets quality standards and is ready for use.
If necessary, players can retake or adjust their submissions to ensure the final emote perfectly captures their vision. This flexibility enhances user satisfaction by providing options to refine the content. Of course, this part of the feature is totally optional.
Finally, the Kinetix API delivers the user-generated emote, in formats like FBX or GLB, ready to be integrated into your game, allowing the player to use it with their avatar.
Ready to integrate the User-Generated Emote feature with the Kinetix API? Follow the steps below!
Go on and upload your avatar as a .fbx file.
Create an account on our Developer Portal :
(Optionnal) On the same page, you can see that 3 things are limited with this key : Feature users: Overall number associated to this key (limited to 40) User-Generated Emote API calls: overall number of get calls associated to this key (limited to 2000) Number of emotes generated: Overall number of successful user generated emotes associated to this key If you wish to upgrade your key, you can click on the "Upgrade to Unlimited" button. You can find additional information on our pricing here:
The raw swagger documentation API can be found there :
Make sure you know all about the feature before moving on.
You can find all the corresponding to the authentication step in
To receive emotes crafted on your players' avatars, you need to upload your game's avatar on the . Learn more:
Please send a kind , we will be happy to support you.


Learn more about how and where you can integrate the User-Generated Emote feature for your players to create emotes seamlessly.
The User-Generated Emote feature introduces innovative possibilities for personalization and interaction within gaming environments. Below are strategic use cases highlighting how this feature can be seamlessly integrated into video games, enriching player experiences:
Overview: Immerse players deeper into their gaming experience by enabling them to create bespoke emotes during character creation.
Benefits: Empowers players to define their character's personality through expressive emotes, fostering a strong emotional connection between player and avatar.
Implementation: Seamless integration requires collaboration with character customization tool providers and game engines supporting real-time AI processing.
Overview: Offer User-Generated Emotes in the in-game store to enhance player engagement through accessible customization options.
Benefits: Drives revenue via microtransactions, incentivizes player activity through exclusive emote rewards, and diversifies in-game customization choices.
Implementation: Clear in-game currency guidelines and a user-friendly interface within the store interface are crucial for a successful integration.
Overview: Provide players with an organized hub to manage and assign custom emotes through their profiles.
Benefits: Centralized control enhances social interactions, empowering players to curate emote selections that align with their preferences.
Implementation: A user-friendly interface across different gaming platforms ensures seamless synchronization and accessibility.
Overview: Elevate player-to-player interactions by integrating User-Generated Emotes within in-game chat or communication systems.
Benefits: Enriches social experiences, fostering community engagement and enabling players to convey nuanced emotions beyond standard emotes.
Implementation: Incorporation within communication systems requires moderation tools for content control and seamless integration for a natural user experience.
Overview: Motivate player progression by rewarding completion of in-game tasks or achievements with access to unique User-Generated Emotes.
Benefits: Encourages exploration, incentivizes player engagement, and adds tangible value to the player's journey.
Implementation: Clearly defined in-game goals tied to meaningful rewards ensure a balanced integration within the game's progression system.
Overview: Include User-Generated Emotes as exclusive rewards within Battle Passes or subscription-based programs.
Benefits: Drives player engagement, encouraging continued participation and investment in the game's ongoing content.
Implementation: Integration within premium content offerings requires strategic placement within the Battle Pass tiers or subscription benefits, enhancing their value proposition.
In this page, learn how to leverage the API routes to implement the User-Generated Emote feature in your game.
The OAuth 2.0 method of authentication consists in generating an authentication token. This can then be used as tokenized temporary credentials. The implicit flow is a browser only flow. It can be used in web applications that need access tokens and cannot make use of a backend. Ask for a client ID if you need to implement this flow.
GET https://auth.kinetix.tech/login
Initiates user authentication and redirects to the pre-registered callback URL with the authentication token in the URL fragment.
client_id*
String
The ID of the requesting client
response_type*
String
Defines the flow type, here it's implicit flow: token
redirect_uri
String
The redirect_uri the client wants to redirect to
POST https://sdk-api.kinetix.tech/v1/plans
Content-Type: application/json
x-api-key*
GameAPIKey
Content-Type*
String
application/json
In this section, learn how to let your players communicate with our AI directly though your game, to create emotes.
GET https://sdk-api.kinetix.tech/v1/process/token
Obtain a token to authenticate emote creation processes.
Content-Type*
String
application/json
x-api-key*
String
VirtualWorldKey
userId*
String
Virtual world's user ID
POST https://sdk-api.kinetix.tech/v1/process
Initiates an ML process to generate a user-generated emote from a token.
Content-Type*
String
application/json
x-api-key*
String
VirtualWorldKey
x-api-token*
String
Token uuid
mature*
boolean
If the content is for adults only
start*
example":"00:00:00.000
Start time of video
end*
example":"00:00:02.000
End time of video
name*
String
Name of the emote to create
video*
Video file
Supported : AVI, FLV, MKV, MP4, TS, MOV, WebM
GET https://sdk-api.kinetix.tech/v1/process/{uuid}
Get a user process status. The user must be associated to requesting virtual world
Content-Type*
String
application/json
x-api-key*
String
VirtualWorldKey
uuid*
String
The process uuid returned by the POST /v1/process route.
POST https://sdk-api.kinetix.tech/v1/process/{uuid}/validate
Content-Type*
String
application/json
x-api-key*
String
VirtualWorldKey
uuid*
String
The process uuid returned by the POST /v1/process route.
POST https://sdk-api.kinetix.tech/v1/process/{uuid}/retake
When the validation flow is activated, this will reject the process and return a new generation token to let the user retry. If you want to let your users the capacity to retake an emote, you have to let them validate or not an emote when it's generated. It means that, after generating an emote, players will have two options: validate the process if they're satisfied with the emote output they received, or retake the process.
Content-Type*
String
application/json
x-api-key*
String
VirtualWorldKey
uuid*
String
The process uuid returned by the POST /v1/process route.
GET https://sdk-api.kinetix.tech/v1/process/token/{token}
Determines the status of a previously generated token.
Content-Type*
String
application/json
x-api-key*
String
VirtualWorldKey
token*
String
Token generated
userId*
String
Virtual world's user ID
GET https://sdk-api.kinetix.tech/v1/process/dev-token
Create a QR code for the specified user. By default, it will use the virtual world id 1. Virtual World can be changed by specifying one of its keys.
Content-Type*
String
application/json
x-api-key*
String
VirtualWorldKey
userId*
String
Virtual world's user ID
Virtual world's key
String
The Developer Portal is a centralized platform designed for you to manage the User-Generated Emote feature during your game's run phase.
To get started with the Developer Portal, you must first:
Uploading Avatars is one of the core functions of the Developer Portal, as it allows you to:
The Developer Portal allows you to try the User-Generated Emote feature so that you can have a look at how it would look like for your end-users.
For more information, visit:
Once the User-Generated Emote feature is integrated in your game with the SDK, you can monitor the content created by your players directly from the Developer Portal.
Kinetix's Moderation strategy is both proactive and reactive:
Proactive moderation is automated
Reactive moderation is up to you, and accessible from your Developer Portal, in the "UGC Moderation" tab.
For more information, visit:
You will find the different HTTP return codes that the API is able to return:
Learn how you can provide your users with the best User-Generated Emote experience, once the feature is correctly integrated in your game.
Moderating User-Generated creation and Emote usage is fundamental for a fun and safe virtual immersion.
Kinetix is heavily promoting responsible user-generated content (UGC) creation and usage. Our moderation approach combines proactive measures and moderation strategies to ensure a safe and enjoyable experience for all gamers. This page provides an overview of our comprehensive emote moderation strategy, relying on three key pillars:
framing and binding UGC usage before UGC creation
moderation of created content before integration into the game
support moderation in-game.
Let's dive into the details:
Towards Gamers / Emote Creators: Kinetix implements content policies that require gamers to acknowledge the following conditions, which are to be integrated into the game's terms and conditions:
Agreeing to Kinetix and the game's terms and conditions
No copyright/trademark infringements in the emote's name and description
Consent for data collection
Towards Games: Integrating User-Generated features come with a minimum layer of moderation effort from the games:
Games can configure if they allow mature content to be created and distributed.
If the target audience is below 18 years old, stronger moderation measures are applied to prohibit both mature and prohibited emotes.
UGC Price: To discourage the creation of inappropriate emotes, Kinetix recommends to set a higher price for User-Generated emotes compared to regular ones. This pricing strategy motivates gamers to think twice before creating content that may be considered inappropriate (and thus deleted), as they are aware that their User-Generated Emote could be deleted if it does not meet the guidelines.
Moderation at Video upload and hosting: Kinetix has implemented a first control layer at the video upload stage when video enters Kinetix servers to control and validate the content present in the uploaded video. Leveraging a video analysis technology, Kinetix servers check if the video contains any atrocious or hateful content that should be immediately deleted.
Mature Content creation: Gamers have the ability to mark their emotes as "mature" content if applicable, providing transparency and allowing appropriate categorization by games.
Naming and Description NLP moderation: To prevent gamers from naming or describing emotes with harmful content, Kinetix is developing an NLP-based brick that will analyze and actively moderate emote names and descriptions.
User-generated emote creation moderation model:
Kinetix has developed an AI-based moderation model to prevent the creation of most hateful and prohibited moves during emote creation process. This algorithm currently identifies and corrects basic prohibitive and offensive moves, such as the Nazi salute or the middle finger. Ongoing efforts aim to enhance the algorithm's capability to detect and prevent other prohibited and offensive moves.
[COMING SOON] AI-based flagging system : Kinetix is developing an AI-based flagging system to identify potentially offensive emotes. This algorithm, trained based on games specificities, will flag emotes that may be considered offensive. The game's moderation team will also be able to review and manage these flagged emotes based on their own guidelines. Additionally, our moderation team can handle the moderation process, ensuring a seamless experience for the game.
Moderate UGC Capacity: Games moderation team has the authority to activate or deactivate User Generated emote creation for specific gamers based on their unique identifiers. This ensures that harmful gamers can be prevented from creating and distributing inappropriate content.
In order to configure your moderation strategy, go to:
At Kinetix, we are committed to upholding community standards and promoting a safe and inclusive environment within games. Our comprehensive emote moderation strategy aims to empower gamers while maintaining responsible content creation and usage. By leveraging proactive measures and AI-based moderation, Kinetix strives to foster an enjoyable and respectful experience for all gamers.
Upload your avatar(s) on the Kinetix Developer Portal to ensure optimal retargeting of User-Generated Emotes within your game, and generate emote icons that fit your avatar(s)'s body shape.
Uploading an avatar into the Developer Portal allows Kinetix to precisely learn how your avatar is built, and automatically ensure that the retargeting that you will benefit in your game is optimal. Retargeting is a mandatory step to transfer 3D animations into your game.
You must uploading onto the Developer Portal every avatar from your game that has a unique rig/skeleton.
If you have a rig for female avatars, one for male avatars, and another one for non-binary avatars, then you should upload the three of them.
If you use the same rig for all your avatars, then please upload the most iconic one (for instance the one that you use for your marketing communication).
Please ensure your avatar meets the following guidelines before uploading:
Your file must be in .fbx format.
Please make sure that the extension is in lowercase (.fbx instead of .FBX).
Files in the following formats are not animation files, these are not suitable for our platform: .mp4, .svg, .png, .ply, .stl, .x3d, .abc...
The version of the .fbx should be one of the following:
FBX 2018
FBX 2020
Your .fbx should preferably be written in binary rather than ASCII. If your .fbx doesn’t have the right version or is in ASCII, import it in your preferred 3D software and export it again with the suitable parameters.
We accept files up to a maximum of 200 MB, including texture images that are embedded in the file.
Your avatar file must include both a skeleton and a mesh.
Your file must not contain multiple skeletons (rigs). Otherwise, import your avatar in your preferred 3D software, locate the skeleton that is bound to the mesh by trying to move them, then delete any skeleton that doesn’t affect the mesh.
Avoid specific joint chains such as skirts or hairs as those joints cannot be taken into account when retargeting your animation. Otherwise, make sure to provide a version of your rig that doesn’t have any of these joints. For quick results, you can delete the skeleton of your avatar and export it as a mesh only, and use an autorig such as Mixamo or Accurig in order to get a suitable skeleton. (see above hint)
Your file can contain texture images as long as they are embedded in your file (make sure that the textures don’t weigh more than 50 MB).
Your file must not include any animation nor contain any kind of keyframe. If it does, open it in a 3D software, select every joints and every meshes, then remove any keyframes that appear in the timeline. Export it back as a .fbx file.
Avoid including unrelated entities in your file such as curves, controllers, light sources, or any 3D software-specific solvers. If you file includes some, import your .fbx in a 3D software and make sure to only keep 3D meshes and joints. Delete the rest then export back as an .fbx file.
If your character has any, make sure to remove any props or accessories. If your character does have props, import it in your preferred 3D software, then delete any mesh and joints that correspond to any props or accessory. Make sure to only keep the character’s meshes and skeleton. Export it back as a .fbx file.
To learn how to upload your avatar from A to Z, you can follow the steps from the video below:
First, log into your Developer Portal Account and head to the "Avatar Management" section.
There you will be able to click on "Upload an avatar".
Type the name you want to give to your avatar.
Select a .FBX file that contains your 3D character, in Y-up position and with skeleton (bones) and mesh, smaller than 10Mb.
Click on "done".
Once you have uploaded your avatar (in a good format - a Y-up character in an FBX file), you will be redirected to the Bone Mapping pages, where you can check that your character has been correctly mapped by our retargeting algorithm, and adjust the bones if needed.
This step is necessary to be performed, in order to ensure a good quality of retargeting of animations on your avatar. We retarget animations from the Kinetix Avatar to your avatar using this mapping. Therefore, we encourage you to fully understand the Kinetix Avatar’s skeleton.
The Kinetix bones are as the following:
Once you've understood how Kinetix's Avatar is built, and know what your custom character looks like, you are ready to proceed to the Bone Mapping.
On your screen, you will see your avatar, and around it several text boxes:
The label of a text box is a Kinetix bone that needs to be mapped.
The content of the text box is the name of your avatar’s bones.
Upon first landing on the bone mapping page, you’ll notice that we have automatically mapped some (if not all) of your avatar’s bones. We encourage you to double-check these to ensure the quality of the final result.
You can click on a bone and drag to connect to a text box, or you can click on a text box and drag to connect to a bone. You can also click on a text box to manually select a bone by its name, instead of dragging and searching for it.
When a text box is selected, you’ll see a small modal showing where it is ideally supposed to be mapped, according to the Kinetix Standard Avatar.
Be careful! It is not because all your bones are automatically mapped that it has been done without mistake. You need to check all of the bones and make sure that the bones mapped by the algorithm actually match. Mis-mapping a mandatory bone will severely damage the animation outputs.
Simply drag the little dot next to Kinetix's bone names (on the left and right columns) and drop it on the corresponding bone on your character. When holding a dot, you can see where you have to plug it if you look at the picture that appears on the left/right-top corner of your screen.
Hand bones may or may not be mapped. However, they must be mapped if you would like to ensure your avatar’s fingers also follow the animations. For each finger, we have named the bones as 0, 1, 2 starting from the bone closest to the main hand bone. (For example, Index_0, Index_1, Index_2).
Before validating your bone mapping, you can preview it as your avatar plays 3 Emotes. It's a great occasion for you to check that bones are correctly mapped. If your character is acting weirdly, it means that something went wrong with the bone mapping! If needed, you are able to go back to the previous steps and adjust mid-mapped bones.
Once you have validated your bone mapping, your avatar will be processing. In general, you can expect to wait from 2 to 5 minutes for your avatar to be processed and completely usable.
Contact-Aware Retargeting is a special retargeting method that suits characters with a complex / uncommon morphology, resulting in meshes that expand far from the skeleton.
If your game / apps follows the conditions below, you are eligible to Contact-Aware Retargeting:
The avatars featured in your game do not have too many different skeletons & shapes. Contact-Aware Retargeting suits particularly games that have 1 or just a few different avatars. Note that 2 avatars with the same skeleton & shape, but different textures are counted as 1 single avatar.
The avatars featured in your game cannot be customized though sliders that would affect the character's mesh.
The avatar featured in the game are quite "unsual". In case your avatars are quite similar to Kinetix's "Sam" avatar (Male, thin/atheletic, 1.70 meters, ...), using Contact-Aware Retargeting would be irrelevant.
As you contact Ben, do not forget to specify the ID of the avatars you want to have the Contact-Aware Retargeting enabled on. (Log into your Developer Portal -> go to "Avatar Upload" -> click on "Display Avatar ID").
Once they are ready, your avatars that benefit from the Contact-Aware Retargeting will appear on the Developer Portal, in the Avatar Upload section, with the "Premium" banner visible on their avatar card.
To let your eligible avatars benefit from the Contact-Aware Retargeting, head to the corresponding section:
Retrieves information about your current subscription plan. You can upgrade your plan at any time on the .
If you want to let your users the capacity to retake an emote, you have to let them validate or not an emote when it's generated. It means that, after generating an emote, players will have two options: validate the process if they're satisfied with the emote output they received, or retake the process. Note that for now, you cannot benefit from the validate/retake process on your own: you have to ask to activate it for you. When the validation flow is activated, this will make the emote available to the user.
Create your Developer Portal account by registering
Link your game / virtual world to your Developer Portal account, by registering your Game API Key, in or .
Preview the outputs of the , directly on your game's avatars.
Enable the for your game.
To access the demo, simply log into your , and head to the "Try UGC feature" section.
200(OK)
Request processed successfully. The response is different for each API, please refer to the operation's documentation
201(Created)
Request processed successfully. The response is different for each API, please refer to the operation's documentation
204 (No Content)
Request processed successfully. The response is empty
208 (Already Reported)
Request processed successfully through the cache. The response is different for each API, please refer to the operation's documentation
400 (Bad Request)
Syntax error. For instance, when a required field was not provided. The response is as defined in
401 (Unauthorized)
API key not provided or invalid. The response is as defined in
403 (Forbidden)
API key is valid, but the application has insufficient permissions to complete the requested operation. The response is as defined in
404 (Not Found)
Cannot found the asked resource. The response is as defined in
406 (Not Acceptable)
This is not acceptable to process the asked ressource (mature content, etc...). The response is as defined in
409 (CONFLICT)
The ressource already exists. The response is as defined in
413 (Payload Too Large)
The request is larger than the server is willing or able to process. (video too long, etc...). The response is as defined in
425 (Too Early)
The request try to update a resource before it's available. The response is as defined in
428 (Precondition Required)
The request is valid but you need to setup something before. The response is as defined in
429 (Too Many Requests)
The user has sent too many requests in a given amount of time. The response is as defined in
500 (Internal Server Error)
API error. The response is as defined in
Want to learn more about the User-Generated Emote feature? Check out
This page only concerns User-Generated Emote management once installed. If you want to integrate the feature in your game, head to the corresponding section: - - -
Facilitate Reported Emotes Identification and Deletion: is a unified, secure, and accessible front-office for games to manage emotes usage in their game. Within the , games can identify and delete reported UGC in-game. This process helps improve the moderation system, as validated reports contribute to the learning and enhancement of our AI-based flagging system.
If you want to learn more about Kinetix's proprietary retargeting algorithm and bone mapping, head to .
If you have an .obj file, please refer to this section
In case of a dense mesh, you can follow in Blender or do it in another 3D software, and then rebind your mesh to your skeleton and copy the skinning from your high poly mesh to your low poly mesh.
Ensure your avatar's skeleton contains unique joint names. Otherwise, rename the problematic joints with suitable names in your preferred 3D software. You can base the naming of your joints on Mixamo’s skeleton or .
If you have followed our guidelines and your avatar is still facing an error on the Developer Portal, please reach out to .
Please, do not hesitate to if you need any help to map your avatar.
You can learn more about
As of today, the Contact-Aware Retargeting is not directly accessible to games. Game have to contact to access the feature.
If your game / app is eligible to Contact-Aware Retargeting, you may from Kinetix's technical team, to compute your characters with the appropriate retargeting method.
Unity SDK:


Learn more about the prerequisites to leverage the User-Generated Emote feature.
Video maximum duration: 10 seconds
No video resolution limitations - 1080p is preferred
Compatible with any video format (MP4, AVI, MOV, MKV,...).
Real-life footages only. Footages from video games or animation films are not supported for the moment. It may happen that some non-real-life footages be detected by our AI and produce good outputs, but it is very uncertain. Kinetix strongly recommend not to upload cartoon / unrealistic footages.
Full body movement: supported.
Finger / hand movements: supported. At the moment, Kinetix AI is spotting if the fists are clenched, hands and fingers are opened or fingers are detached (celebrating victories ✌️for example). More complex hands movements are still hard to detect but Kinetix keeps improving its models at large scale.
Facial expressions: not supported for the moment - we are working on it!
Half body: not supported. The outputs for videos capturing only half-body movements are unpredictable. We strongly recommend using videos where the entire body is visible to ensure reliable and accurate results.
Multiple actors: not supported. Optimal results are achieved with videos that include 1 actor. We strongly recommend using videos where only one body is visible to ensure reliable and accurate results.
Estimated Waiting Time: average uploading + processing time for a 5-10 sec video = 5 min.
Multiple processing: the Kinetix AI can process up to 200 videos simultaneously.
Emote directly accessible in-game and attributed to the user that created it.
Everything mentioned inKinetix Emote Standards will be applied with our emotization script.
Because emotes and animations intricacies can be hard to grasp.
API: Application Program Interface
Avatar: Representation of a gamer in a game. Refers specifically to a rig and mesh designed by the game (or third party avatar provider)
Emote: Emotes are animations that express any gamers' emotions like dances, gestures & celebrations.
Emote SDK: Integration solution of the User-Generated Emote feature for any engine compatible games
Game: Any video game, social application, or other virtual environments projects seeking to integrate Kinetix's AI Emote technologies.
Gamers: Game's users leveraging Emotes for various purposes.
GLB file: Stands for “GL Transmission Format Binary file”. A standardized file format that is used to share 3D data, for example, the data for a 3D avatar model.
Developer Portal: the Developer Portal is a centralized web-hosted interface to manage all everything that is emotes-related.
To report a bug, request for features or get help on the integration.
There are three ways to get in touch with us:
You can submit the following request form to let us know about any bug you encountered:
We will do our best to help you out in the best delays!
Questions about our User-Generated Emote feature? Let's answer it!
Learn how to maximize the output quality using our User-Generated Emote feature.
This page guides you through various guidelines, best practices, and tools to optimize video recording and/or uploading, for an optimized emote output.
Remember: Kinetix’s AI only captures human movements!
Please find below the Kinetix recommendations to optimize the video input.
Stable camera movement: ensure the camera is positioned on a flat, stable surface. This stability is crucial for capturing clear, consistent footage, essential for creating high-quality emotes without distortion or interruption.
All the body within the frame: make sure all the movements are fully captured within the camera's frame. If recording yourself, position yourself centrally and keep a consistent distance from the camera, ensuring all your movements—from feet to head and arms—are clearly visible and accurately captured.
Single (human) character: we recommend featuring only one person in the video frame, even though our system supports multi-character inputs. This best practice ensures that the AI can focus on the movements of a single individual, thereby avoiding to consider the wrong actor. Having just one performer in the frame minimizes potential distractions. When using a video taken from the Internet that includes multiple actors, we recommend to crop the video, in order to focus on the desired performer.
Area of movement: ensure the movements are contained within a well-defined space, ideally maintaining all activity within a 1-meter radius from the center point.
Grounded start: begin your video with a grounded stance. Ensure that your starting position is firmly on the ground, as starting mid-air or in an elevated position can cause difficulties for the AI in accurately interpreting your movements.
Clothing: if possible, opt for well-fitting attire, avoiding loose or baggy clothes. Snug clothing ensures the movements are captured accurately and distinctly, facilitating a more precise translation of the actions into emotes.
Colors: be careful not to wear clothes and shoes that have the same color as the background. It's important to distinguish every part of the human body from the others and from the background.
We're here to help!
The UserId allows the identification of every user within your game or virtual world. You are the one creating them, make sure to choose something unique and immuable. You can for example use the UserID of the distribution's platform, such as the SteamID of your users.
This error occurs when your PackageCache folder is read by other softwares than Unity. You can try to close your IDE (Visual Studio/Rider/etc...) and then download the packages again through the Kinetix Package Manager.
You can email directly for any request
You can also connect with the community on to discuss with other developers.
Yes. Once you have integrated the User-Generated Emote feature in your game, you can manage the way emote icons appears using the . Head to the "Emote Icon Manager" tab and customize your icons!
Register on to generate your VirtualWorld API key and starts leveraging Kinetix's AI Emote technologies.
The pricing associated with Kinetix pipes is per API call: every time an emote is generated (API called) by one of your users/players, Kinetix will charge you with a fixed price. No upfront or integration costs!
For , prices start at 0.15€ per emote generated.
Exceptional discounts can be applied based on expected volumes and adapted to preferred partners and early adopters that are part of the . For more information, .
Feel free to or to ask in our , the team will be happy to help!
Any questions? Feel free to - we'll always be happy to help!
Your VirtualWorldKey is an API key that you can request at

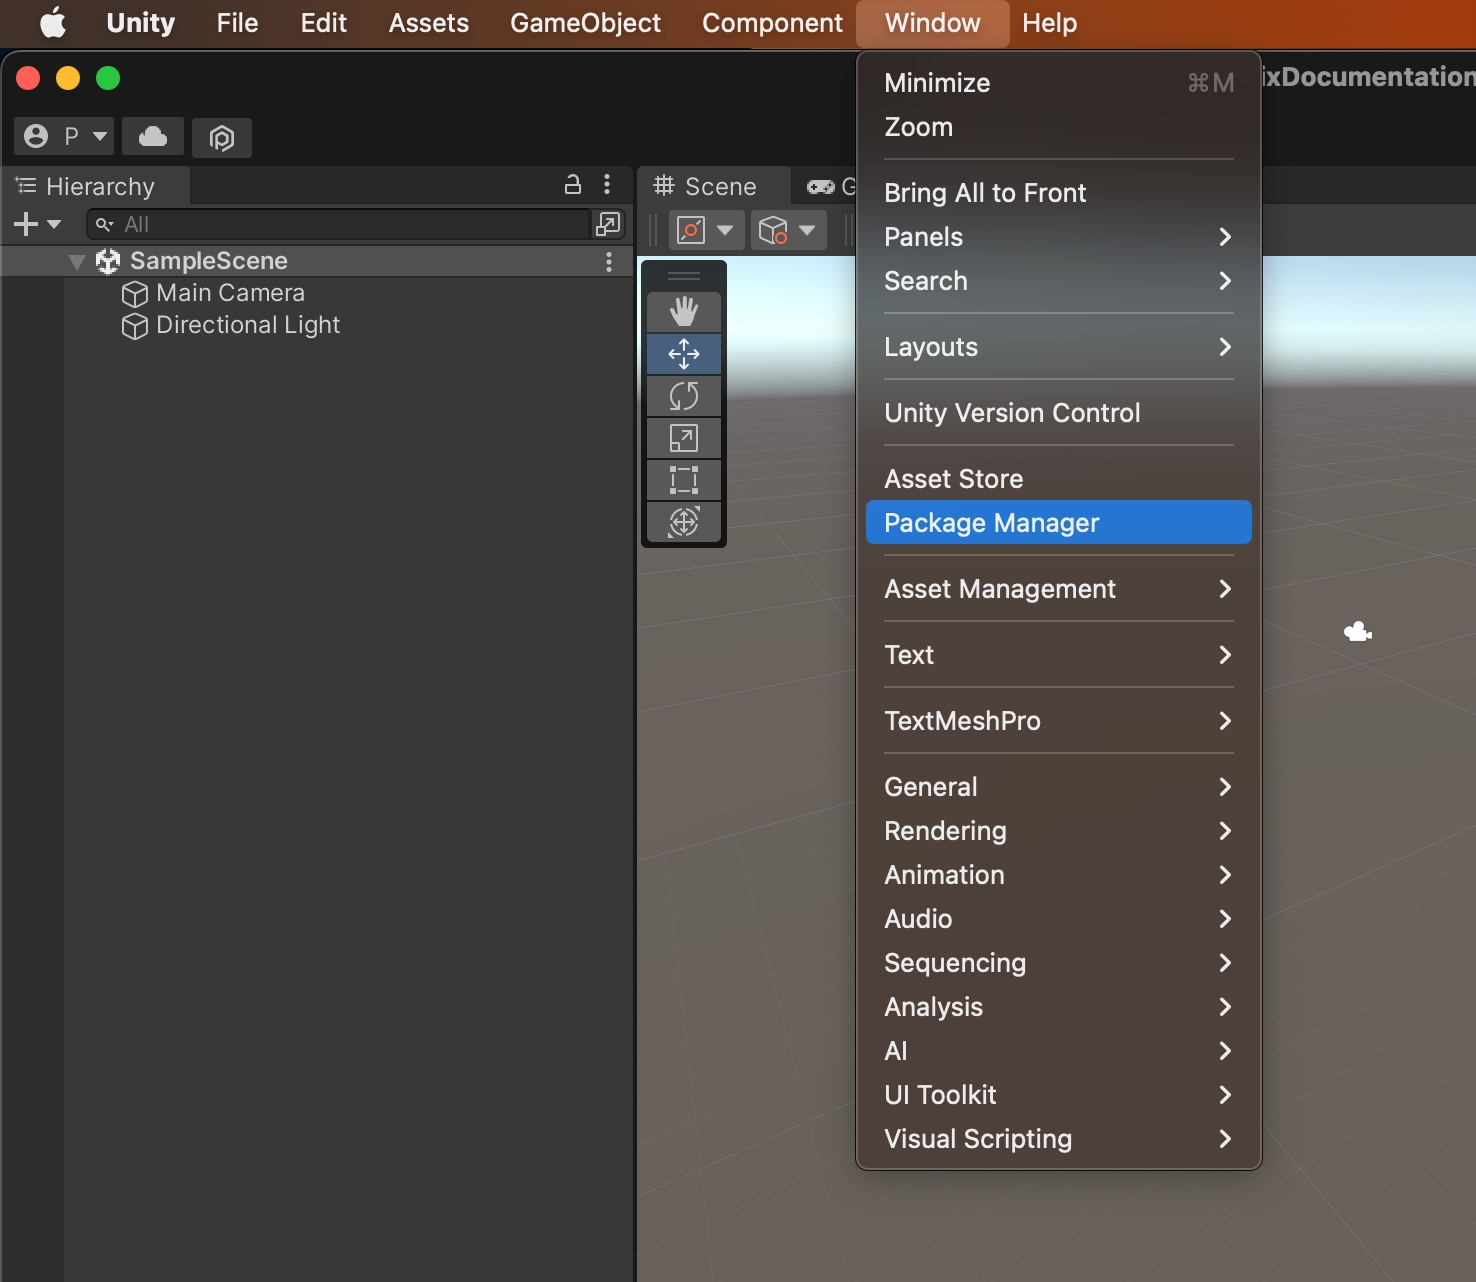
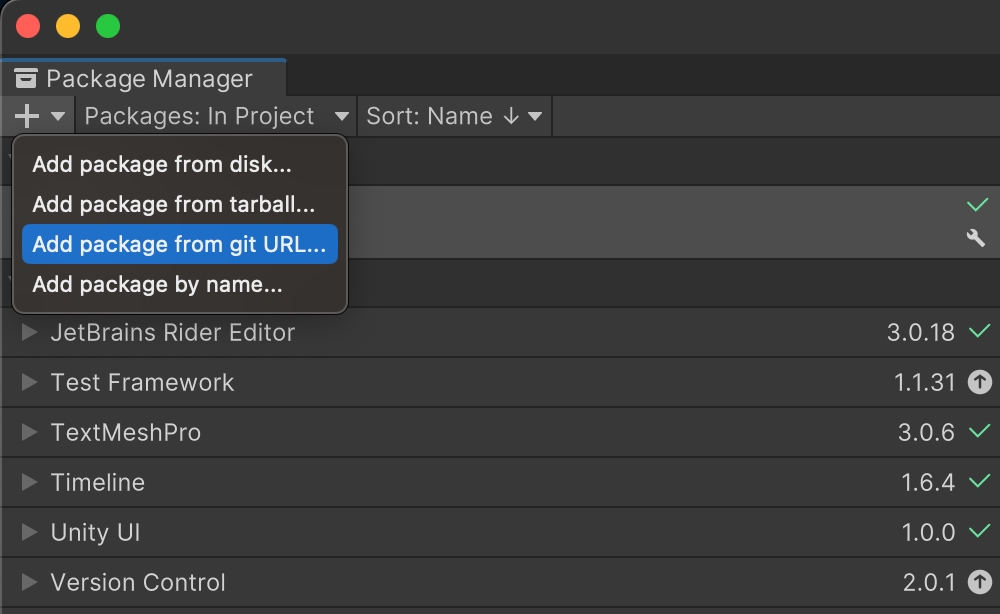

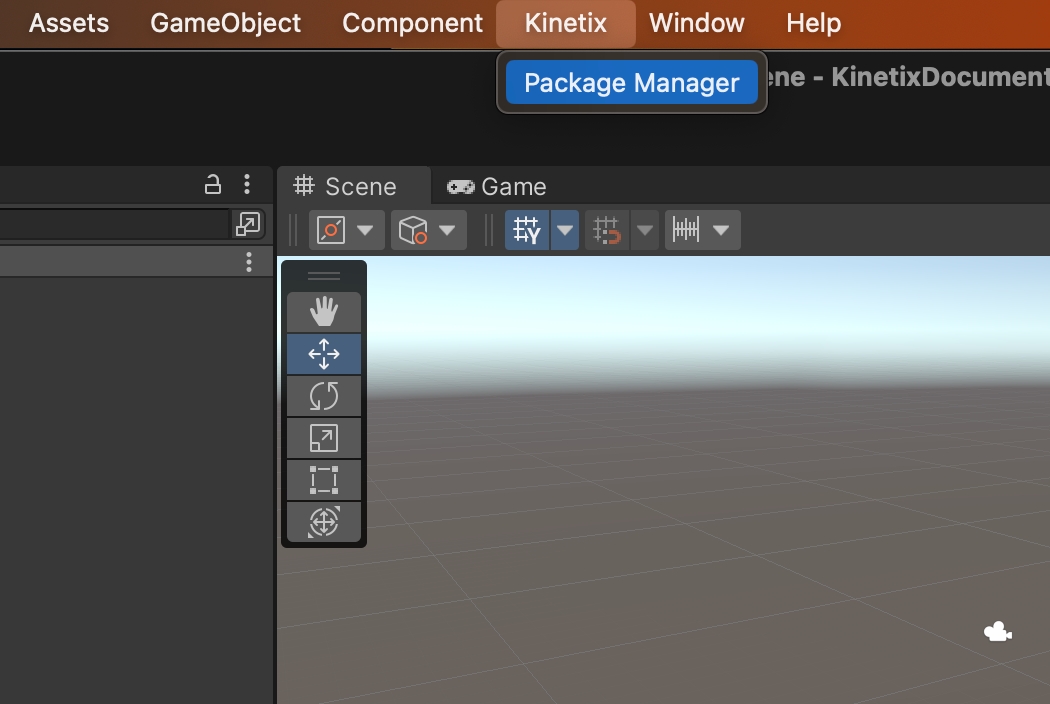
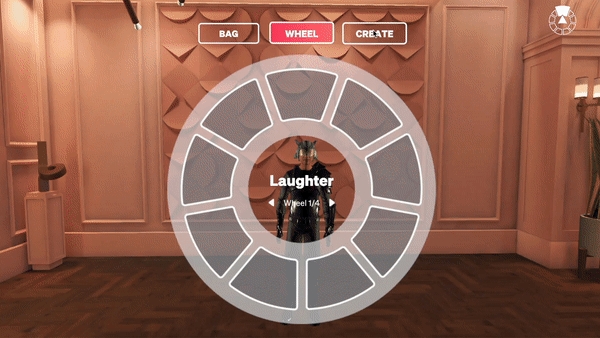
Questions about our Unreal Engine SDK? Let's solve them!
Questions about our Unity SDK? Let's solve them!
You can remove user-generated emotes from a player's bag through your account. Head to the UGC Moderation tab to do so, and follow the flow.
For Unreal Engine, Kinetix uses the standard built-in system for animation. This means you typically don’t need any additional plugins to animate bones or cloth physics when integrating Kinetix’s AI Avatar Animation. The engine’s native capabilities should suffice for most use cases, providing smooth integration and performance. However, if you have specific requirements or complex setups, consider reviewing Unreal Engine’s documentation or consulting with for tailored advice.
You can remove user-generated emotes from a player's bag through your account. Head to the UGC Moderation tab to do so, and follow the flow.